Posts: 1,778
Threads: 213
Joined: Jul 2013
Reputation:
2
Location: The North
Car Model/Spec: HDI
Really looking forward to more updates on this, ph1 build looks cool too!
So is this a 2.0 8v bottom end/2.2 mostly build? Or are you also flying the flag for the 2.0 16v HDI clan?
Posts: 1,430
Threads: 132
Joined: Jan 2012
Reputation:
4
Location: Yorkshire
Car Model/Spec: 305 and 306 HDi's
(21-12-2016, 02:17 PM)MY95 Wrote: Really looking forward to more updates on this, ph1 build looks cool too!
So is this a 2.0 8v bottom end/2.2 mostly build? Or are you also flying the flag for the 2.0 16v HDI clan?
Still 2.0 bottom end so still a 2.0!
Sent from my iPhone using Tapatalk
Posts: 13,881
Threads: 476
Joined: Dec 2011
Reputation:
81
Location: Ipswich
Car Model/Spec: 306 Rallye
lots of work! Another interesting project!  Do the c4 vts brakes bolt straight on and use the original brake line fittings? could be a nice oem upgrade
Posts: 20,092
Threads: 591
Joined: Nov 2012
Reputation:
54
Location: Cotswolds
Car Model/Spec: Stage 13 16v HDi


(21-12-2016, 03:07 PM)Eeyore Wrote: lots of work! Another interesting project! Do the c4 vts brakes bolt straight on and use the original brake line fittings? could be a nice oem upgrade
Yup. Clearly you dont watch my videos 
Need 16" wheels tho min
Posts: 45
Threads: 2
Joined: Nov 2013
21-12-2016, 06:41 PM
(This post was last modified: 21-12-2016, 10:44 PM by kyler000.)
Excellent project, have a lot of love for phase1 looks
Posts: 13,881
Threads: 476
Joined: Dec 2011
Reputation:
81
Location: Ipswich
Car Model/Spec: 306 Rallye
(21-12-2016, 05:05 PM)Piggy Wrote: (21-12-2016, 03:07 PM)Eeyore Wrote: lots of work! Another interesting project! Do the c4 vts brakes bolt straight on and use the original brake line fittings? could be a nice oem upgrade
Yup. Clearly you dont watch my videos
Need 16" wheels tho min
Been watching 24/7 since the beginning and still haven't got up to that bit.
Posts: 20,092
Threads: 591
Joined: Nov 2012
Reputation:
54
Location: Cotswolds
Car Model/Spec: Stage 13 16v HDi
(21-12-2016, 07:56 PM)Eeyore Wrote: (21-12-2016, 05:05 PM)Piggy Wrote: (21-12-2016, 03:07 PM)Eeyore Wrote: lots of work! Another interesting project! Do the c4 vts brakes bolt straight on and use the original brake line fittings? could be a nice oem upgrade
Yup. Clearly you dont watch my videos
Need 16" wheels tho min
Been watching 24/7 since the beginning and still haven't got up to that bit.
206 brake upgrade video... But I highlight it fitting other vehicles too.
Tiz indeed a good oem upgrade... Calipers and discs combo is heavy mind
Posts: 3,419
Threads: 120
Joined: Jan 2014
Reputation:
35
Location: Powys / Herefordshire
Car Model/Spec: Rallye/S16 & 175 megane
Wow awesome update
Serious amount of 16v derv builds happening now! next year should be incredibly interesting.
![[Image: 17b33c2a-8471-4313-992e-0a4b324cf926_zps2e63812a.jpg]](http://i143.photobucket.com/albums/r143/matt-taylor/17b33c2a-8471-4313-992e-0a4b324cf926_zps2e63812a.jpg)
Team Cyril
Posts: 3,662
Threads: 127
Joined: Feb 2012
Reputation:
33
Location: London
Car Model/Spec: ZX Volcane TD
Wahay, great update as usual Sam
Such an epic project this!
Posts: 1,430
Threads: 132
Joined: Jan 2012
Reputation:
4
Location: Yorkshire
Car Model/Spec: 305 and 306 HDi's
08-01-2017, 09:28 PM
(This post was last modified: 08-01-2017, 09:29 PM by Sambarker.)
![[Image: d021f48e7477c4af9b80d5aa112bb2b3.jpg]](http://uploads.tapatalk-cdn.com/20170108/d021f48e7477c4af9b80d5aa112bb2b3.jpg)
![[Image: 9fc967a1fad73b3e61165cc343038714.jpg]](http://uploads.tapatalk-cdn.com/20170108/9fc967a1fad73b3e61165cc343038714.jpg)
![[Image: a92df3102874a2ec063efb0b16ad8c1a.jpg]](http://uploads.tapatalk-cdn.com/20170108/a92df3102874a2ec063efb0b16ad8c1a.jpg)
Engine progress.
Bottom end is now fully assembled.
Block was from the 305 estate build and is a 110 hdi 8v block from a 2003 Citroen Xsara. Block has been away to be honed and the top refaced.
Crank has had new bearings, smiley face forged conrods fitted with new bearings and arp bolts.
2.0 16v pistons from an 807 have been fitted with new OEM rings
Stock oil pump refitted and stock Ali sump.
Next stage is I am awaiting some uprated valve springs for the v35 dw12 cylinder head (head removed from a 2001 2.2 hdi Citroen C5). Once these springs arrive the head along with the springs will be going to local engineering place for a rebuild, skim etc ready to go onto the top of the freshly rebuilt block.
Exciting times ahead
Sent from my iPhone using Tapatalk
Posts: 20,092
Threads: 591
Joined: Nov 2012
Reputation:
54
Location: Cotswolds
Car Model/Spec: Stage 13 16v HDi
Becoming a familiar "formula"
Lets all hope its worthwhile 
Posts: 6,367
Threads: 87
Joined: Dec 2011
Reputation:
48
Location: South Yorks.
Car Model/Spec: Rouge vallelunga 5 door Dturbo

Looking forward to this mate, been a while in the making, the phase 1 will make it all the more sleeper 
Phase 1 D-Turdo, K14@24 psi, De-cat, meaty backbox, Bosch pump, grinded LDA pin, duel air fed K&N =133.7bhp & 188ft/lbs
Posts: 1,430
Threads: 132
Joined: Jan 2012
Reputation:
4
Location: Yorkshire
Car Model/Spec: 305 and 306 HDi's
Yeah it's been in the pipeline almost 2 years!!
Sent from my iPhone using Tapatalk
Posts: 1,430
Threads: 132
Joined: Jan 2012
Reputation:
4
Location: Yorkshire
Car Model/Spec: 305 and 306 HDi's
![[Image: 7c61e05657d6f0548e5facc059c0c548.jpg]](https://uploads.tapatalk-cdn.com/20170203/7c61e05657d6f0548e5facc059c0c548.jpg)
Uprated valve springs arrived
Head was sent away to be de-coked, valve springs changed, head has had all new seals and a skim
Once it came back, I stripped the flaps etc out from the inlet and drilled and tapped the end hole and sealed with a bolt
![[Image: 024048c98e367efab04c223432b45e1b.jpg]](https://uploads.tapatalk-cdn.com/20170203/024048c98e367efab04c223432b45e1b.jpg)
![[Image: b51fc427a39f49a396409113b3f7978b.jpg]](https://uploads.tapatalk-cdn.com/20170203/b51fc427a39f49a396409113b3f7978b.jpg)
Next steps are to put the arp head studs on the block and get the head on and torqued down, fit rockers etc, cams and then I can move onto fitting clutch gearbox etc
Manifold plates have all been made so I can also start fabricating my manifold for the 2260
Sent from my iPhone using Tapatalk
Posts: 6,258
Threads: 371
Joined: Feb 2014
Reputation:
29
Location: suffolk
Car Model/Spec: ford fiesta
Nice progress. Looks like nother good build happening
On a break from 306oc for personal reasons. If anyone needs or wants me most of you have my number and or facebook messenger
Thanks for the good times guys n gals. I might be back. Who knows.
Posts: 3,662
Threads: 127
Joined: Feb 2012
Reputation:
33
Location: London
Car Model/Spec: ZX Volcane TD
Great work Sam, such an epic build this
Sent from my iPhone using Tapatalk Pro
Posts: 1,430
Threads: 132
Joined: Jan 2012
Reputation:
4
Location: Yorkshire
Car Model/Spec: 305 and 306 HDi's
Few little jobs done:
Made some stainless studs for the exhaust manifold which at the moment is just a laser cut 12mm mild steel plate awaiting some pipe work!
![[Image: 81b78919e08f283fb96bdfb287686e3a.jpg]](https://uploads.tapatalk-cdn.com/20170217/81b78919e08f283fb96bdfb287686e3a.jpg)
Had to make a minor adjustment to the 8v pump bracket in order to clear the 16v head
![[Image: 13b13e3f3c4bed693a71cb8e33261c38.jpg]](https://uploads.tapatalk-cdn.com/20170217/13b13e3f3c4bed693a71cb8e33261c38.jpg)
![[Image: d0c015f58dedf819739c295453cbb30b.jpg]](https://uploads.tapatalk-cdn.com/20170217/d0c015f58dedf819739c295453cbb30b.jpg)
And sorted out a top engine mount bracket which will a) fit the 8v bottom end b) fit the 16v head and c) clear the fuel pump bracket!
![[Image: ee6128dab31848cb7f6a3b194ee669d4.jpg]](https://uploads.tapatalk-cdn.com/20170217/ee6128dab31848cb7f6a3b194ee669d4.jpg)
![[Image: 1e556cab298fb334733aa7d408a14581.jpg]](https://uploads.tapatalk-cdn.com/20170217/1e556cab298fb334733aa7d408a14581.jpg)
Crank seal also fitted and ready for clutch and gearbox is next jobs! And fitting of the arp studs and fitting timing belt, refitting ancillaries and getting ready to drop into car!
Thanks for reading
Sent from my iPhone using Tapatalk
Posts: 13,881
Threads: 476
Joined: Dec 2011
Reputation:
81
Location: Ipswich
Car Model/Spec: 306 Rallye
great work. So many shinies!
Posts: 6,258
Threads: 371
Joined: Feb 2014
Reputation:
29
Location: suffolk
Car Model/Spec: ford fiesta
always a good to have another update. im following all these 16v builds with great interest and EVERYone seems to be using uprated valve springs. are they really that bad on these??
On a break from 306oc for personal reasons. If anyone needs or wants me most of you have my number and or facebook messenger
Thanks for the good times guys n gals. I might be back. Who knows.
Posts: 3,539
Threads: 42
Joined: Mar 2012
Reputation:
28
I'm guessing its due to light springs in stock applications to keep friction losses down and they can get away with it as the engines dont need lots of revs as they're a modern diesel with modern turbochargers.
And that most modified engines are running much higher pressures in the ports which can hold a valve off the seat?
Posts: 5,205
Threads: 91
Joined: Dec 2011
Reputation:
83
Location: Oxfordshire/Cornwall
Car Model/Spec: Moonstone DT/Volvo V50
(17-02-2017, 07:36 PM)welshpug Wrote: I'm guessing its due to light springs in stock applications to keep friction losses down and they can get away with it as the engines dont need lots of revs as they're a modern diesel with modern turbochargers.
And that most modified engines are running much higher pressures in the ports which can hold a valve off the seat?
Nothing to do with revs really, rather just exhaust and inlet pressure causing the valves to float.
(16-05-2016, 10:45 AM)Toms306 Wrote: Oh I don't care about the stripped threads lol, that's easily solved by hammering the bolt in.  Nanstone GTD5 GT17S - XUD9TE
Volvo V50 D5 R-Design SE Sport - Daily cruise wagon.
Posts: 4,608
Threads: 90
Joined: Dec 2011
Reputation:
54
Location: Cornwall
Car Model/Spec: 1996 306 DT M-TDI/16

I think mainly just because they know the main reason I rebuilt my entire car essentially started just because it was floating the inlets at 25psi..
Sent from my Nexus 5X using Tapatalk
| Dyno Power Runs & Steady State Facilities Available, Just Ask Anytime |
| #DervMafia |
![[Image: sigi-2.png]](http://i281.photobucket.com/albums/kk226/darrenjlobb/sigi-2.png)
Posts: 15,645
Threads: 541
Joined: Dec 2011
Reputation:
124
Location: Aylesbury
Car Model/Spec: 320bhp Impreza WRX
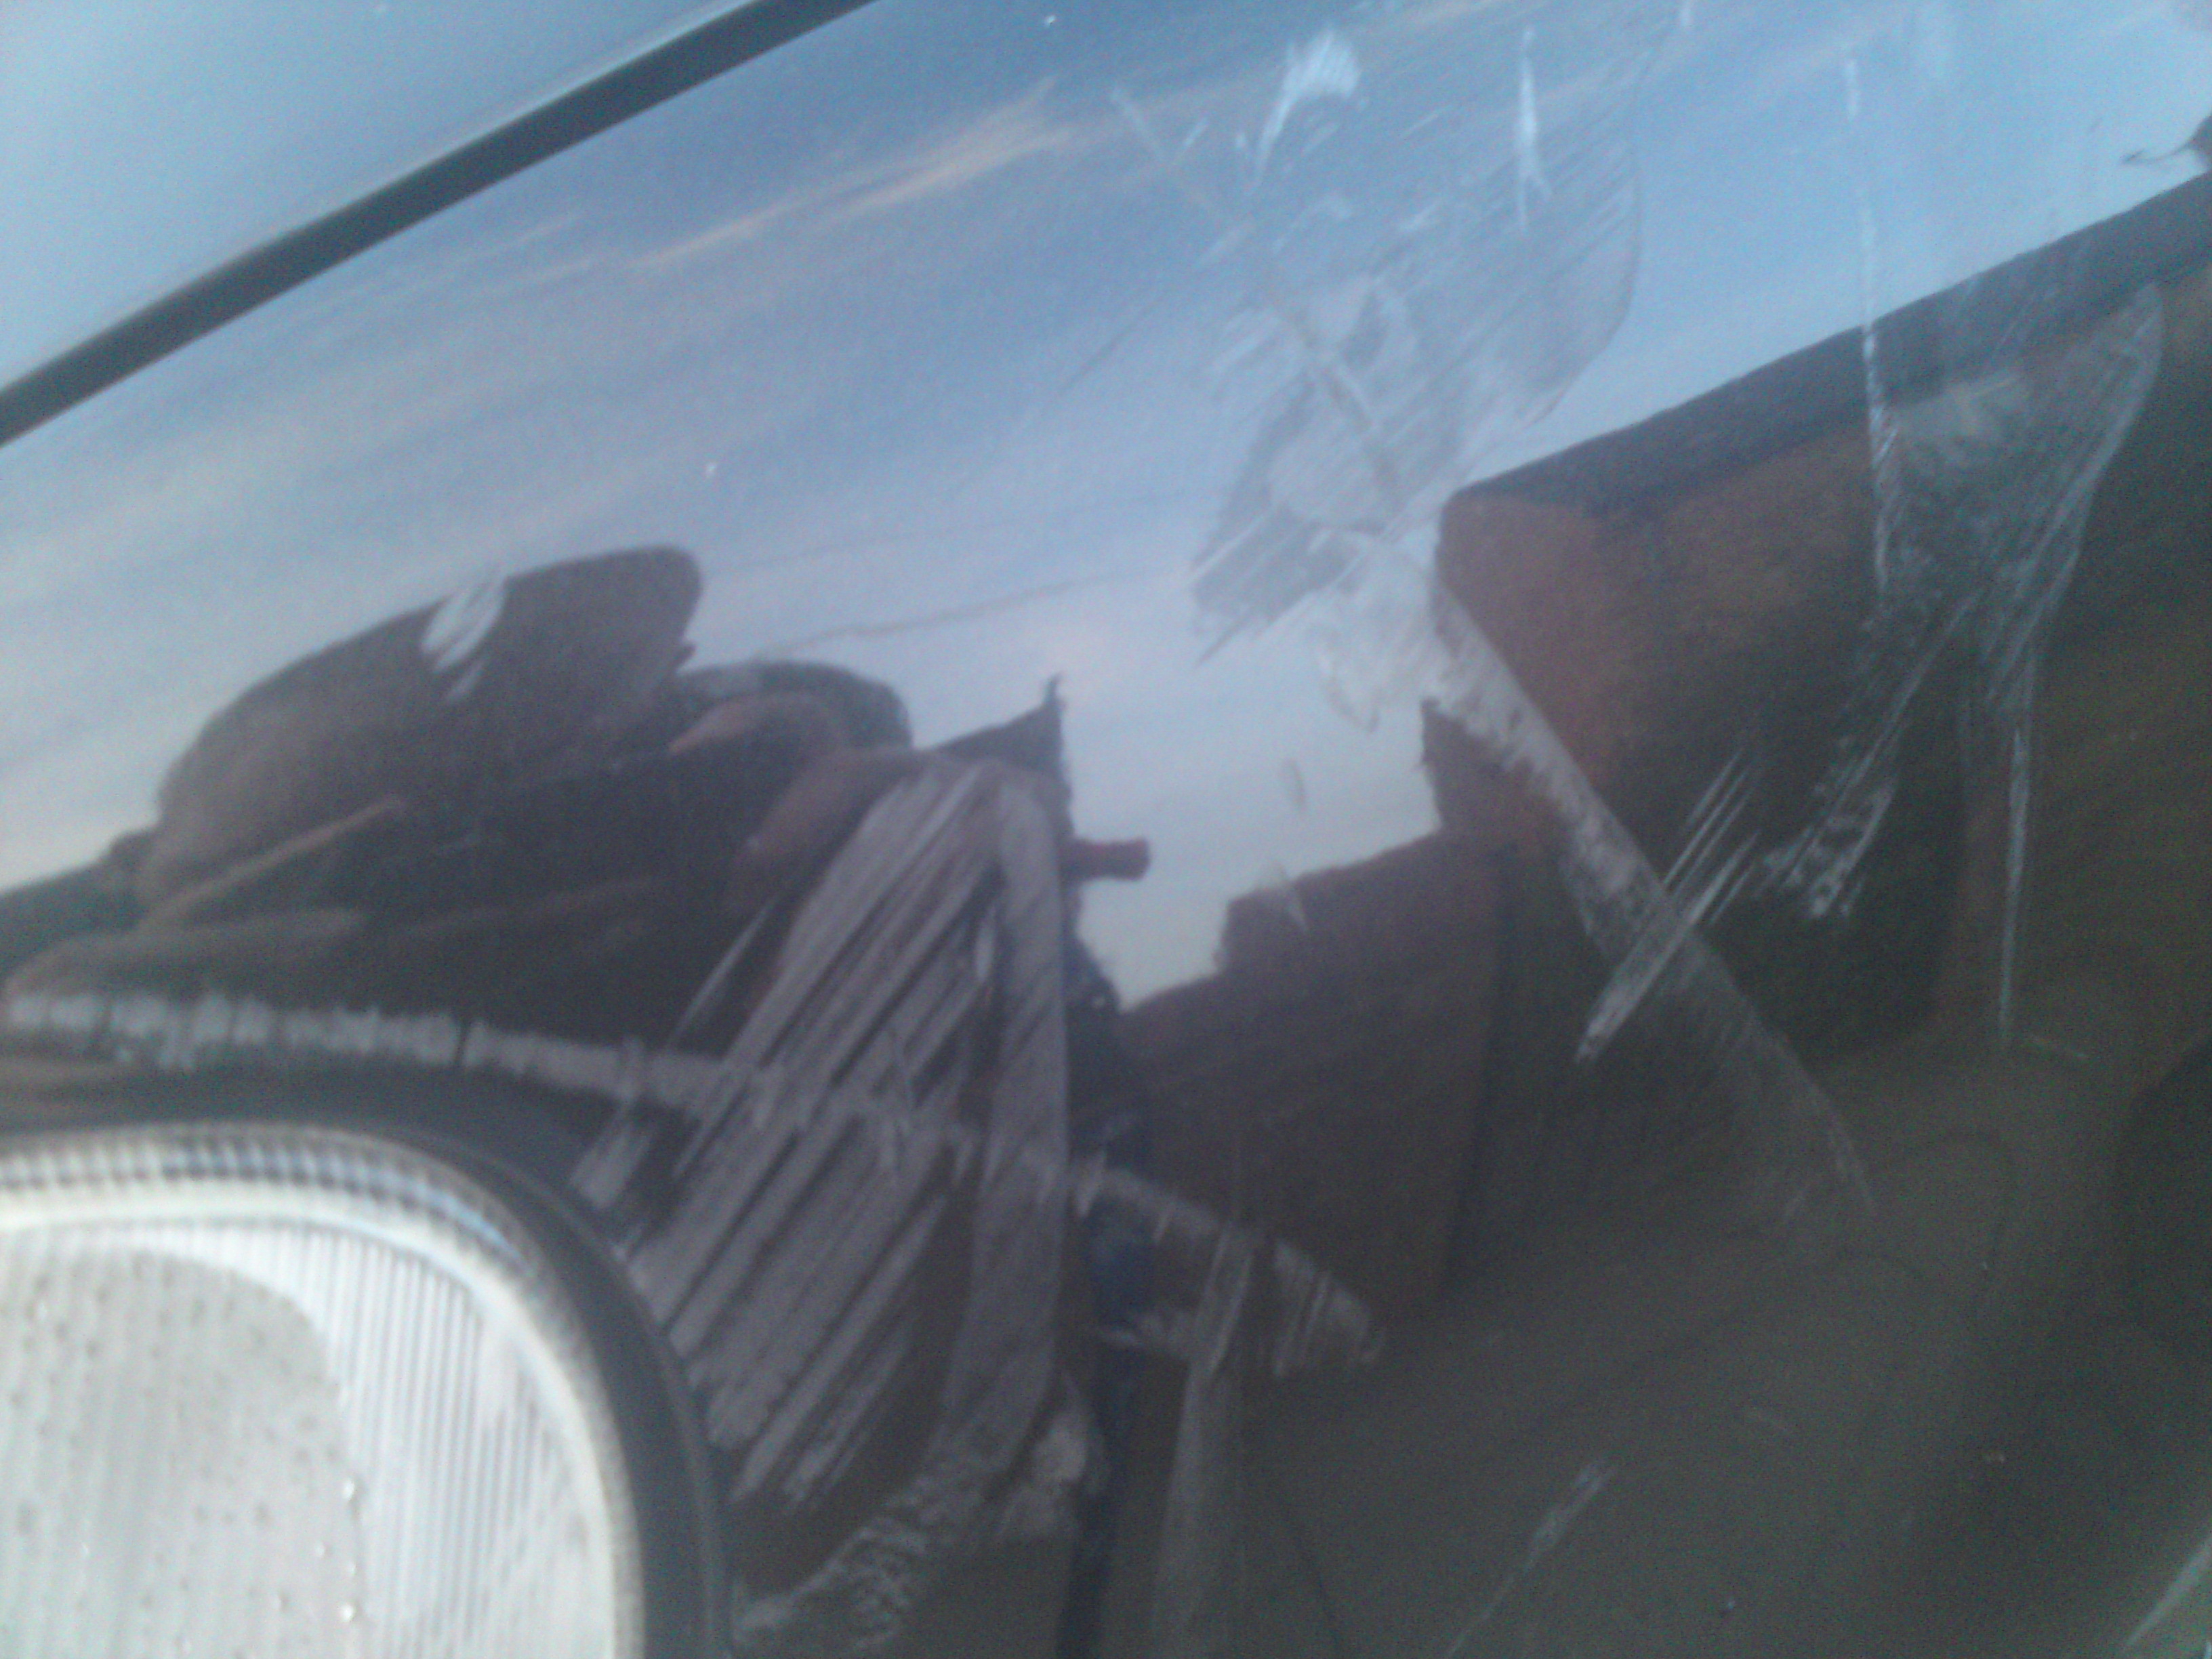
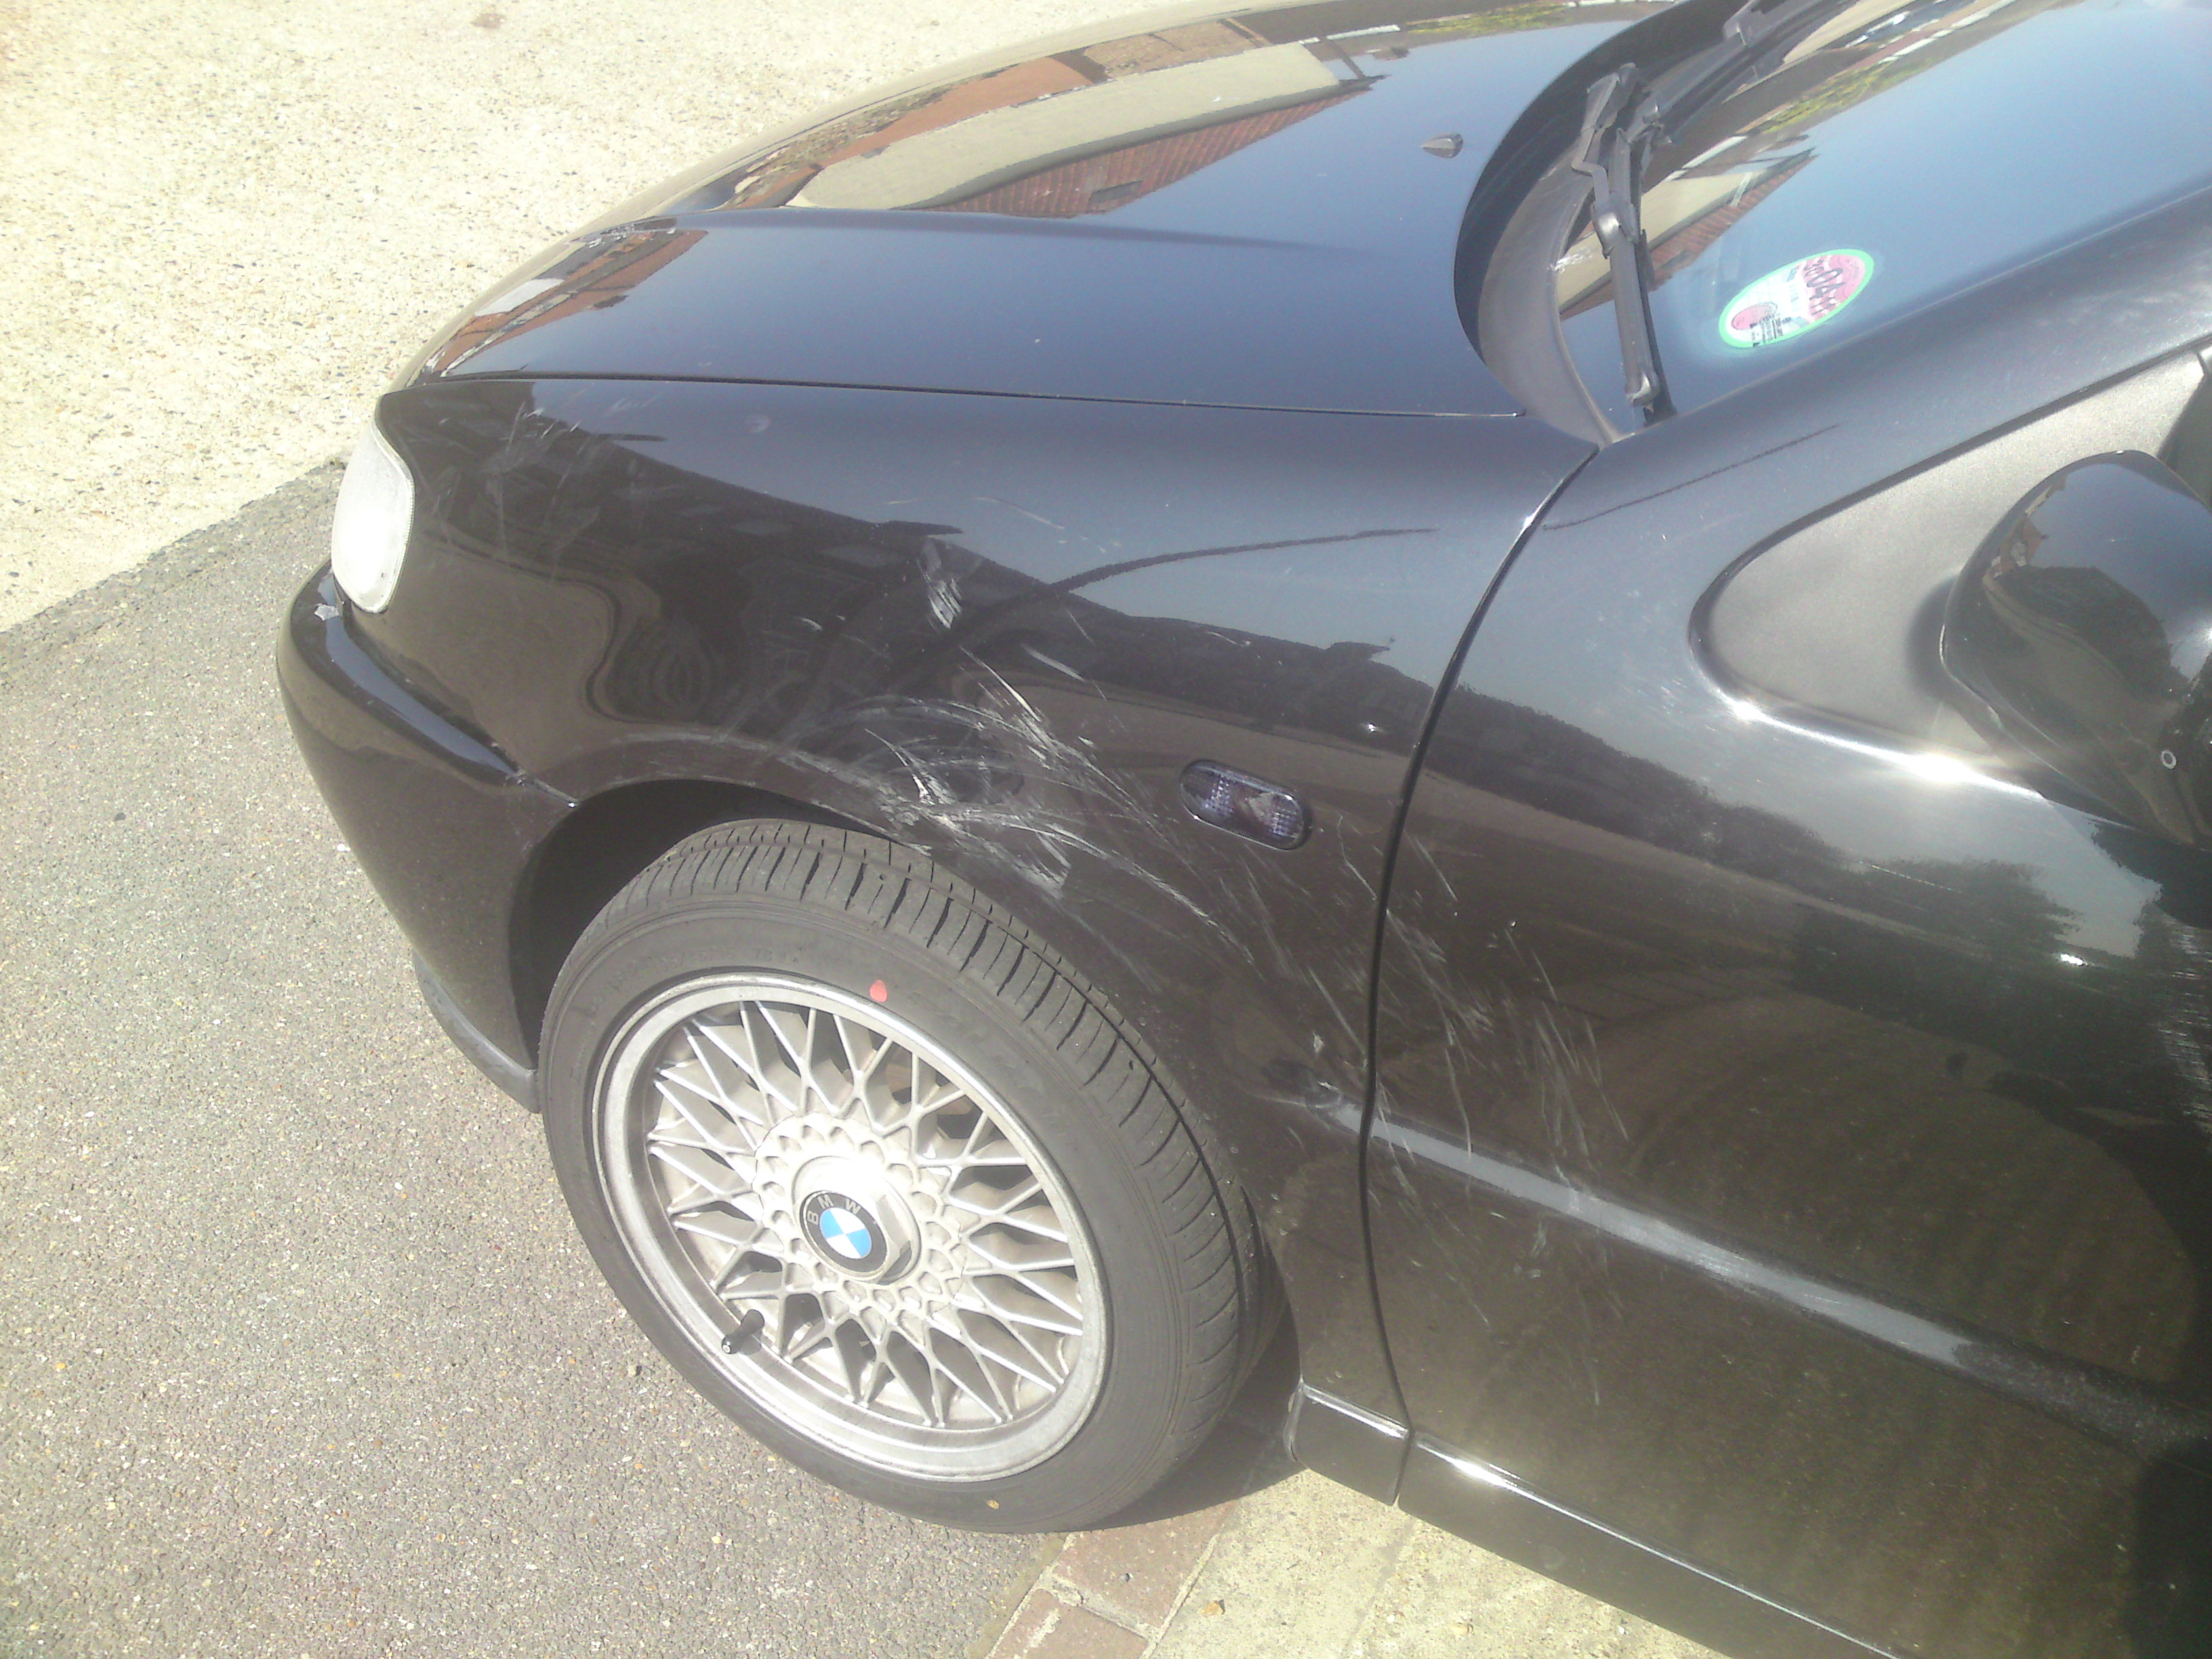
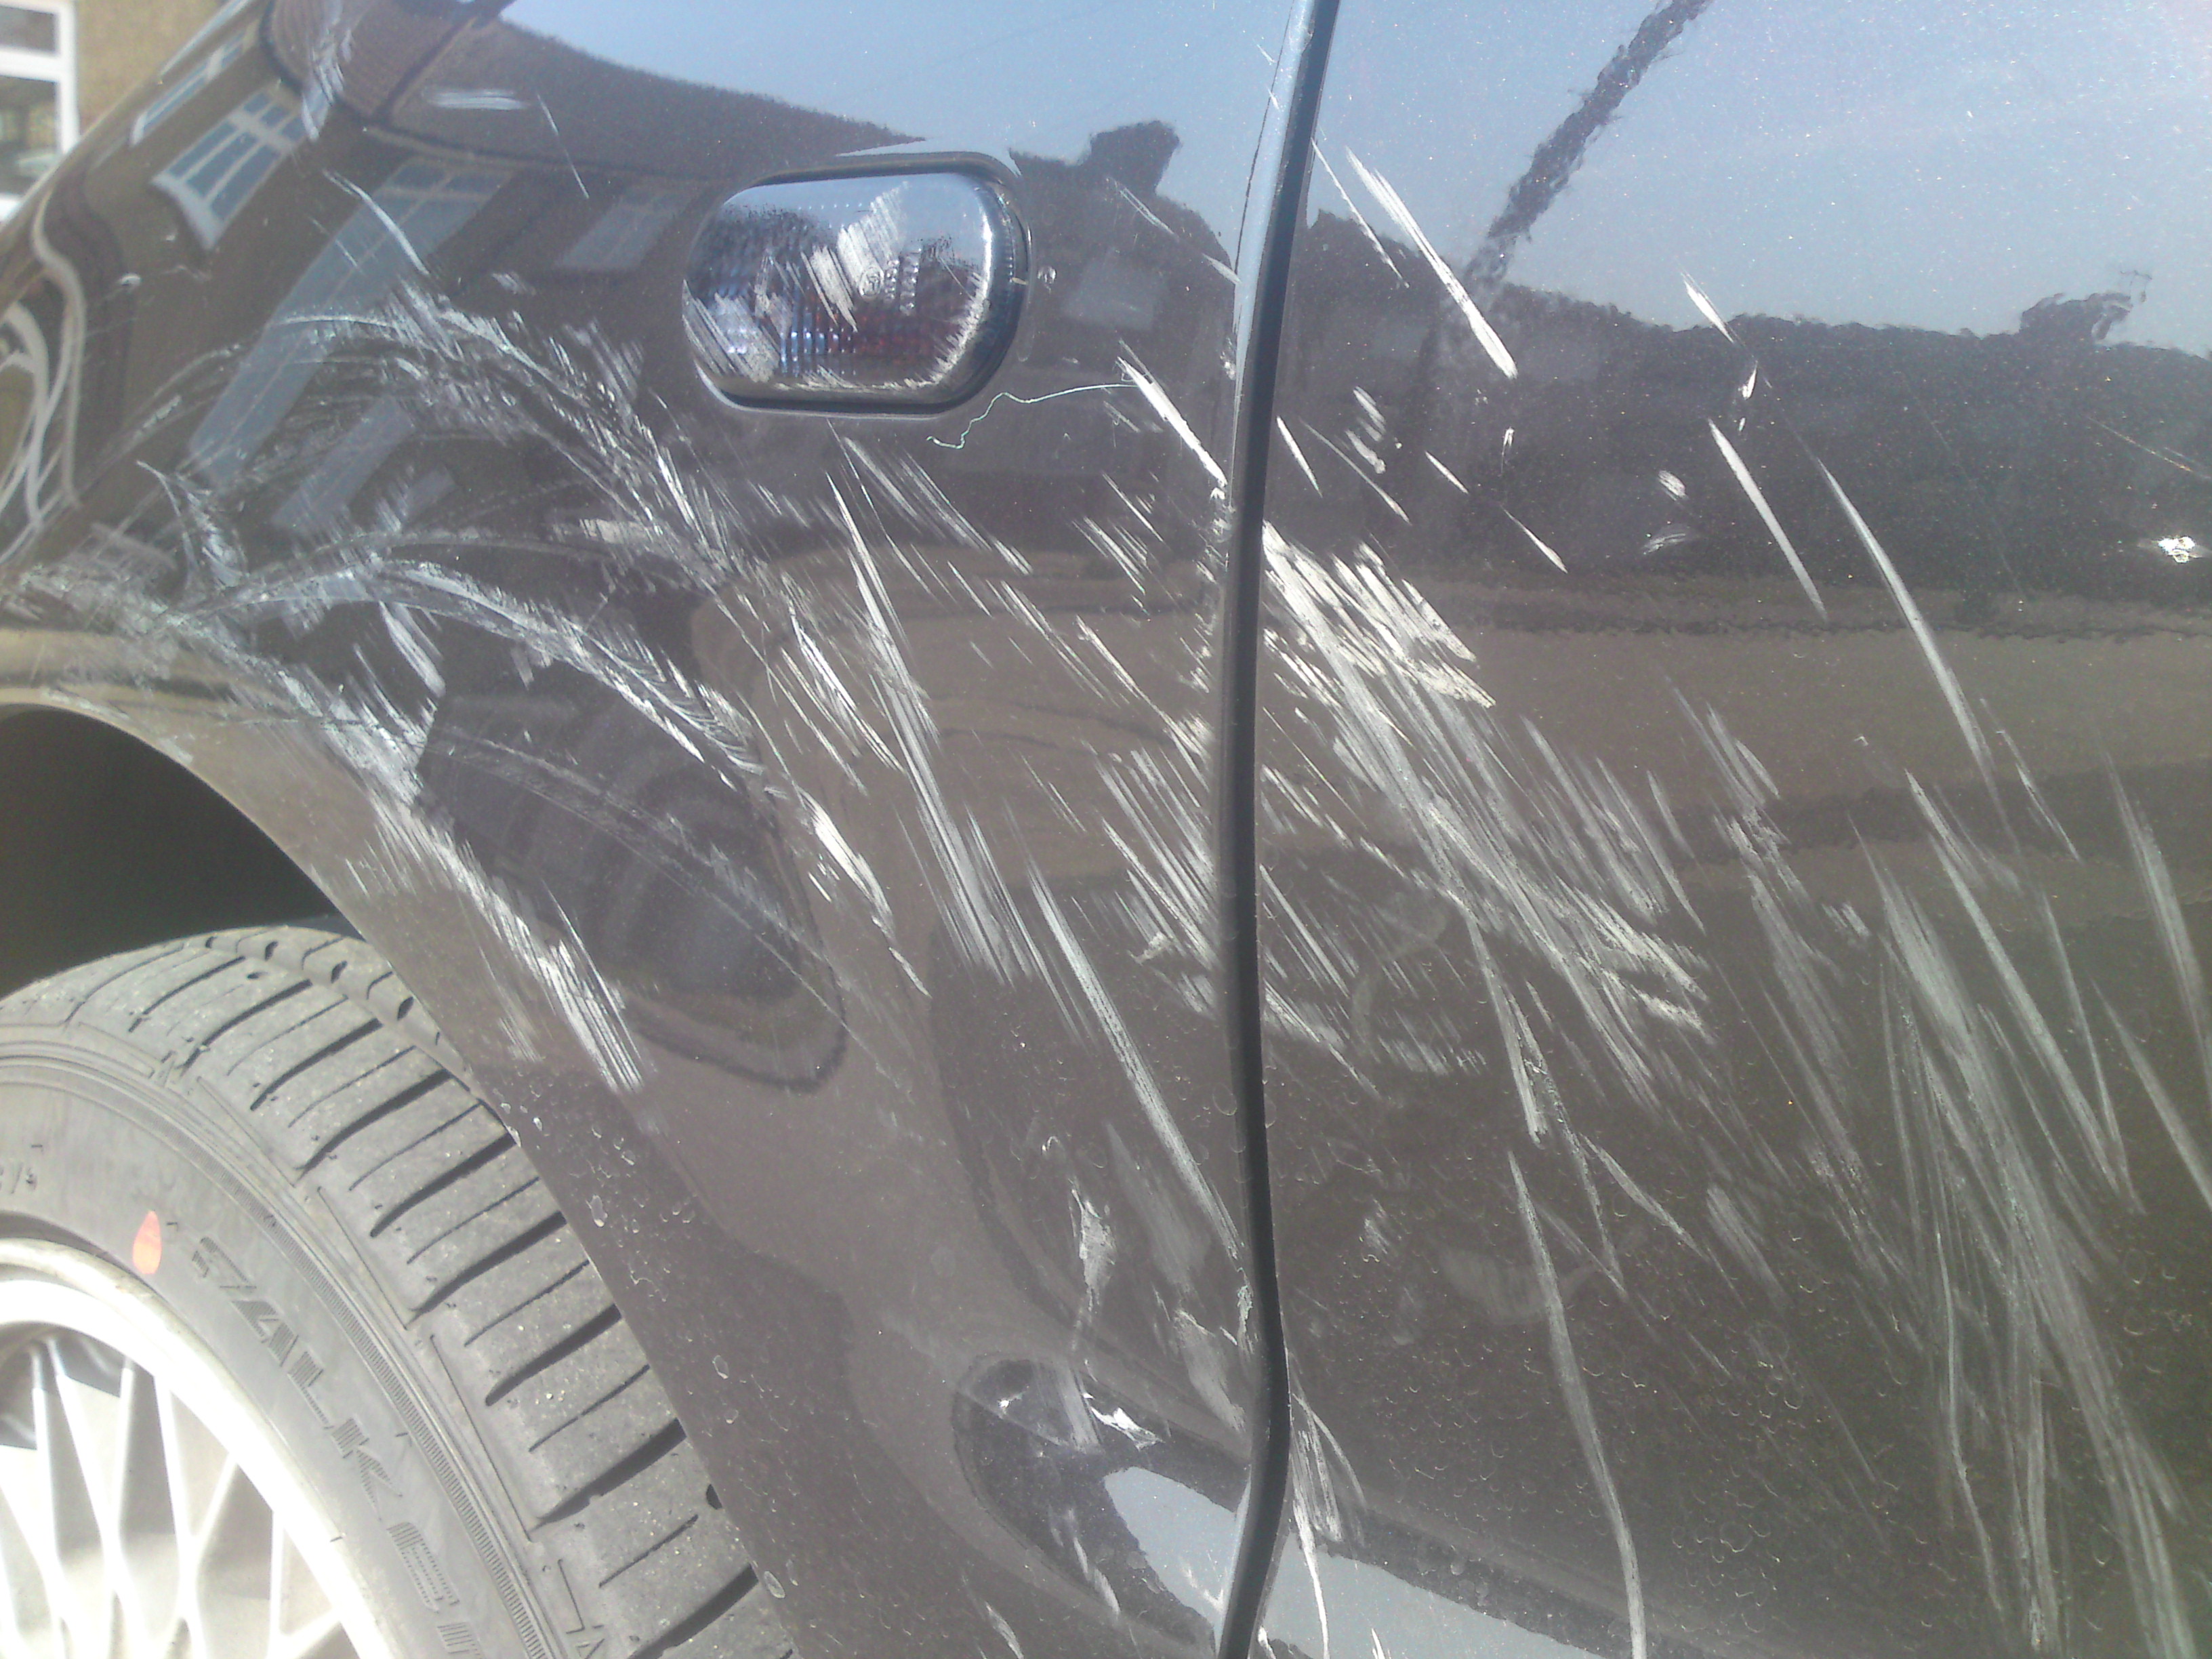
I'd watch the alloygators. IMO they are shit as some enthusiastic cornering will remove them and then untill you stop you'll get the loose end smashing your body work every time the wheel goes round till you stop.
If you like your bodywork and drive hard I'd get rid of them and just learn not to crash into kerbs.
This is my Polo valver after it got attacked by the alloygator.

Posts: 1,430
Threads: 132
Joined: Jan 2012
Reputation:
4
Location: Yorkshire
Car Model/Spec: 305 and 306 HDi's
(18-02-2017, 11:47 AM)Dum-Dum Wrote: I'd watch the alloygators. IMO they are shit as some enthusiastic cornering will remove them and then untill you stop you'll get the loose end smashing your body work every time the wheel goes round till you stop.
If you like your bodywork and drive hard I'd get rid of them and just learn not to crash into kerbs.
This is my Polo valver after it got attacked by the alloygator.
Did you fit them yourself though chris???
Sent from my iPhone using Tapatalk
Posts: 4,608
Threads: 90
Joined: Dec 2011
Reputation:
54
Location: Cornwall
Car Model/Spec: 1996 306 DT M-TDI/16
(18-02-2017, 05:52 PM)Sambarker Wrote: (18-02-2017, 11:47 AM)Dum-Dum Wrote: I'd watch the alloygators. IMO they are shit as some enthusiastic cornering will remove them and then untill you stop you'll get the loose end smashing your body work every time the wheel goes round till you stop.
If you like your bodywork and drive hard I'd get rid of them and just learn not to crash into kerbs.
This is my Polo valver after it got attacked by the alloygator.
Did you fit them yourself though chris???
Sent from my iPhone using Tapatalk [FACE WITH TEARS OF JOY]
Sent from my Nexus 5X using Tapatalk
| Dyno Power Runs & Steady State Facilities Available, Just Ask Anytime |
| #DervMafia |
Posts: 15,645
Threads: 541
Joined: Dec 2011
Reputation:
124
Location: Aylesbury
Car Model/Spec: 320bhp Impreza WRX
(18-02-2017, 05:52 PM)Sambarker Wrote: (18-02-2017, 11:47 AM)Dum-Dum Wrote: I'd watch the alloygators. IMO they are shit as some enthusiastic cornering will remove them and then untill you stop you'll get the loose end smashing your body work every time the wheel goes round till you stop.
If you like your bodywork and drive hard I'd get rid of them and just learn not to crash into kerbs.
This is my Polo valver after it got attacked by the alloygator.
Did you fit them yourself though chris???
I did but they were fitted properly as per the instructions.
TBH you could hardly fit them wrong.
Posts: 1,430
Threads: 132
Joined: Jan 2012
Reputation:
4
Location: Yorkshire
Car Model/Spec: 305 and 306 HDi's
(21-02-2017, 06:34 PM)Dum-Dum Wrote: (18-02-2017, 05:52 PM)Sambarker Wrote: (18-02-2017, 11:47 AM)Dum-Dum Wrote: I'd watch the alloygators. IMO they are shit as some enthusiastic cornering will remove them and then untill you stop you'll get the loose end smashing your body work every time the wheel goes round till you stop.
If you like your bodywork and drive hard I'd get rid of them and just learn not to crash into kerbs.
This is my Polo valver after it got attacked by the alloygator.
Did you fit them yourself though chris???
I did but they were fitted properly as per the instructions.
TBH you could hardly fit them wrong.
I disagree, my dad is an official alligator installer and I went on the training course with him. He also has all the proper alligator tools which I used to fit them. There is a knack to getting them on properly, which is why I haven't had any issues with mine. I'd say yours would be down to installer error, and perhaps a poor wheel/tyre combinations as they fit some wheel/tyres better than others
Sent from my iPhone using Tapatalk
Posts: 1,430
Threads: 132
Joined: Jan 2012
Reputation:
4
Location: Yorkshire
Car Model/Spec: 305 and 306 HDi's
Some more progress on this today
8v motor out
![[Image: 12fd9a66605425c3766332002bc93fe9.jpg]](https://uploads.tapatalk-cdn.com/20170225/12fd9a66605425c3766332002bc93fe9.jpg)
![[Image: fb846904870f05d90dd75b244935552e.jpg]](https://uploads.tapatalk-cdn.com/20170225/fb846904870f05d90dd75b244935552e.jpg)
![[Image: e3232c88e6bb01dbaa0cdd34801897d4.jpg]](https://uploads.tapatalk-cdn.com/20170225/e3232c88e6bb01dbaa0cdd34801897d4.jpg)
Now starting to swap all the ancillaries from this engine onto the new
Then stripped the head off the 8v motor and fitted a spare 16v head to use for mocking up purposes for the new manifold
![[Image: 8c119a089bc197f28f167243192b9793.jpg]](https://uploads.tapatalk-cdn.com/20170225/8c119a089bc197f28f167243192b9793.jpg)
![[Image: fe02e16198ab2471115b5f7fd9180745.jpg]](https://uploads.tapatalk-cdn.com/20170225/fe02e16198ab2471115b5f7fd9180745.jpg)
Sent from my iPhone using Tapatalk
Posts: 91
Threads: 21
Joined: Mar 2015
Reputation:
0
Location: Doncaster
Car Model/Spec: 306 hdi estate
Looking good pal how much fun and games it took to get out. Wish I had the space to do this with mine when I get a plan together of what I want to do.
Sent from my GT-I9505 using Tapatalk
Posts: 1,430
Threads: 132
Joined: Jan 2012
Reputation:
4
Location: Yorkshire
Car Model/Spec: 305 and 306 HDi's
(25-02-2017, 06:53 PM)mattbarker32 Wrote: Looking good pal how much fun and games it took to get out. Wish I had the space to do this with mine when I get a plan together of what I want to do.
Sent from my GT-I9505 using Tapatalk
Engine out is a doddle when you've done it 10+ times before!
Sent from my iPhone using Tapatalk
|









![[Image: 17b33c2a-8471-4313-992e-0a4b324cf926_zps2e63812a.jpg]](http://s143.photobucket.com/user/matt-taylor/media/17b33c2a-8471-4313-992e-0a4b324cf926_zps2e63812a.jpg.html)
![[Image: avatar_zpstlcgvhg8.jpg]](http://img.photobucket.com/albums/v363/toastmonster/avatar_zpstlcgvhg8.jpg)