Posts: 112
Threads: 6
Joined: Feb 2016
Reputation:
0
Location: Surrey
Car Model/Spec: 306 Estate, TU Auto
Thanks: 0
Given 6 thank(s) in 5 post(s)
(16-02-2017, 03:48 PM)Eeyore Wrote: looks good buddy. Its subtly lower. 
Thanks! I had all the work done at a particular Peugeot specialist in Brackley, I had a chat with the mechanic who said it was refreshing to work on such a nice example of an estate. I keep hearing 'attention to detail' which is a real compliment as that's what I'm trying to go for. The Bilsteins are technical what we would call 'tuning' but all in all, its tasteful and a big positive upgrade. 
They asked if I were going to any shows so it's real nice for the car to be put in to that kind of bracket. Maybe I will.
Posts: 3,419
Threads: 120
Joined: Jan 2014
Reputation:
35
Location: Powys / Herefordshire
Car Model/Spec: Rallye/S16 & 175 megane


Thanks: 147
Given 40 thank(s) in 40 post(s)
This car is a credit to you, also shows that people appreciate a proper enthusiast owned and maintained car no matter if its an engine swapped turbocharged track weapon or an automatic estate 
![[Image: 17b33c2a-8471-4313-992e-0a4b324cf926_zps2e63812a.jpg]](http://i143.photobucket.com/albums/r143/matt-taylor/17b33c2a-8471-4313-992e-0a4b324cf926_zps2e63812a.jpg)
Team Cyril
Posts: 112
Threads: 6
Joined: Feb 2016
Reputation:
0
Location: Surrey
Car Model/Spec: 306 Estate, TU Auto
Thanks: 0
Given 6 thank(s) in 5 post(s)
(20-02-2017, 09:13 AM)Matt-Rallye Wrote: This car is a credit to you, also shows that people appreciate a proper enthusiast owned and maintained car no matter if its an engine swapped turbocharged track weapon or an automatic estate 
Thanks again, I'll be bringing it to the Castle Combe Action day, and Pugfest '17. Why not, really.
Posts: 112
Threads: 6
Joined: Feb 2016
Reputation:
0
Location: Surrey
Car Model/Spec: 306 Estate, TU Auto
Thanks: 0
Given 6 thank(s) in 5 post(s)
14-05-2017, 05:19 PM
(This post was last modified: 14-05-2017, 05:43 PM by Nexus.)
Ok, this has been bothering me for ages.. Intermittent speedo sensor. Losing speedo clock for 1-2mins during engine/gearbox warm up. Old vs. New.
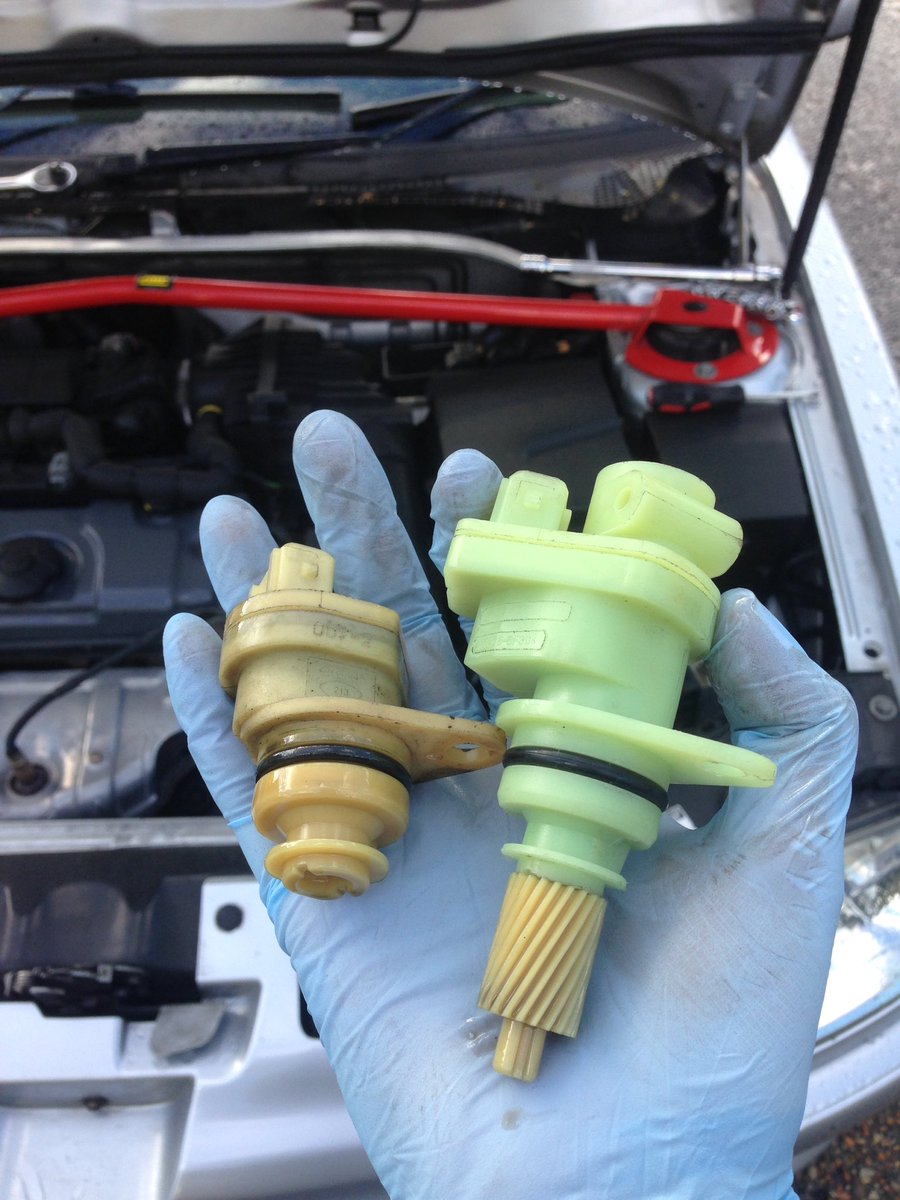
All appears good now. Should have done this a long time ago, for something so simple.
I'm planning a trip to Snowdonia again this year.. went last year with o/h however didn't quite make it up the Llanberis Path. Lets just say they're not big on hiking. So anyway, I know for a fact that the estate has a healthy amount of space in the back, and I already have tinted windows.. Stealth Camper?

I found that by taking out the rear bench seats, it increased the size in the back even more so, giving me access to the rear foot wells where I can store items.
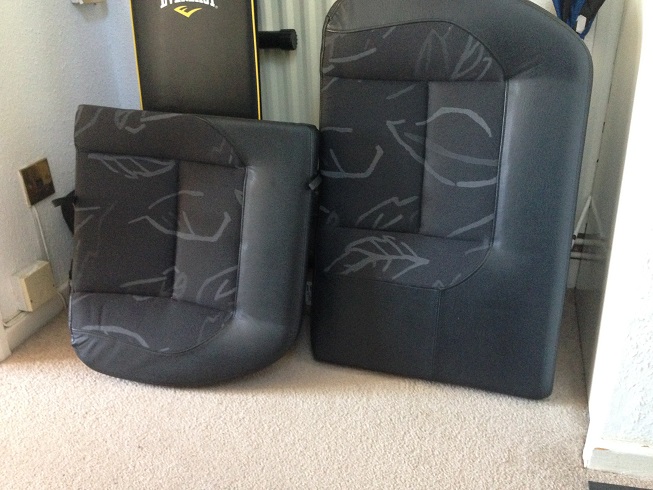
So I took some measurements and found I could fit a single airbed, a small table and still plenty of room leftover for supplies like a camping stove, clothes/luggage etc. Here's my progress so far for my stealth camping holiday to wales:
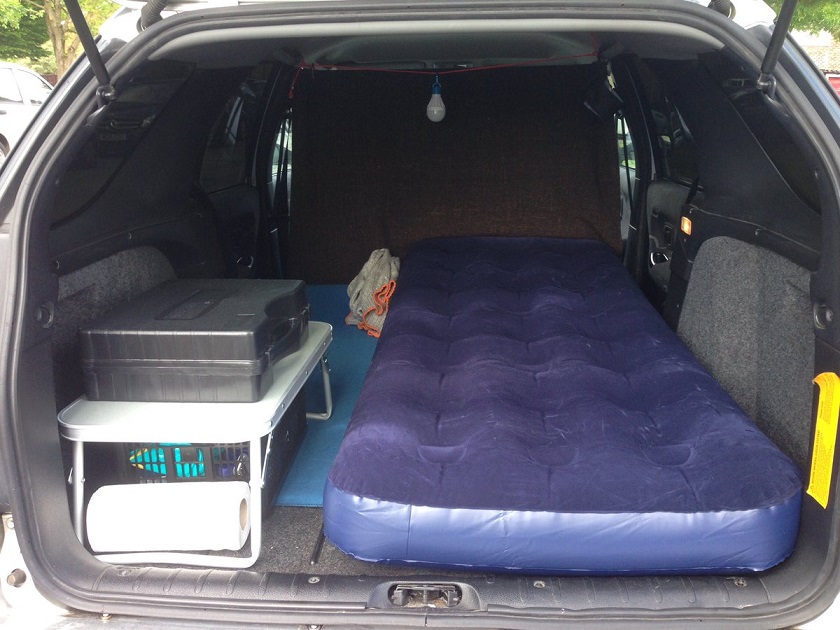
This is a work in progress! If it's pissing down with rain I'll probably deflate the airbed to make some living space but I'm sure once a sleeping bag and bedding is in there, it should be comfy enough for a couple of nights sleep. The curtain is basically a shower pole and an Ikea sofa throw, a fleece blanket for a carpet and a small camping table with a box of equipment underneath - kettle, pots and pan etc. I tied some string/rope between the rear roof door handles and attached a lantern via karabiner. I think it'll be super handy to hook your car keys or small items on to so I don't lose them during the night.
I'll post another pic or two once its looking a little more homely.
Posts: 112
Threads: 6
Joined: Feb 2016
Reputation:
0
Location: Surrey
Car Model/Spec: 306 Estate, TU Auto
Thanks: 0
Given 6 thank(s) in 5 post(s)
01-06-2017, 06:54 PM
(This post was last modified: 10-02-2021, 06:35 PM by Nexus.
Edit Reason: Typos
)
Spent three days camping in the car at Snowdonia last week. 
The view I had on a Wednesday morning with my breakfast.
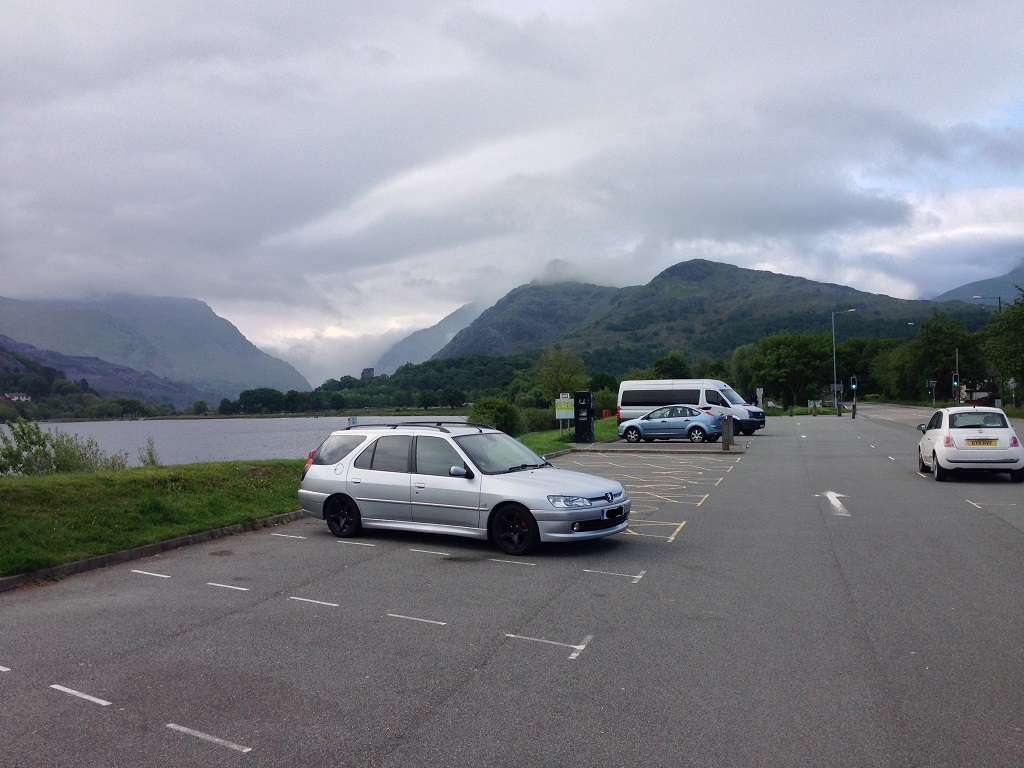
Climbed the Pyg Track path in the fog, then came down the Llanberis Path (tourist path!).

Wasn't too bad camping in the car for three nights, I think the only problem was keeping everything tidy. Plenty of sleeping room, just not a huge amount of room for equipment/clothing and bags etc. Might think about a roof box next time just to dump stuff in thats not used as much.
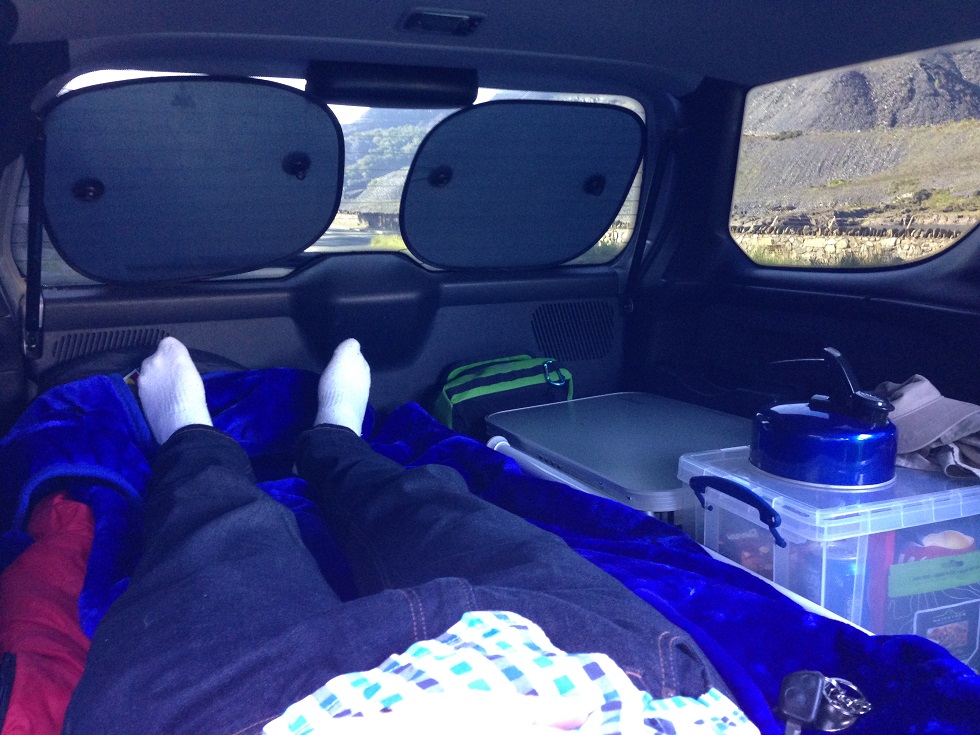
Full length airbed in the back, could sleep with my legs fully outstretched. Not a lot of room for anything else though.
During the day I'd deflate the airbed and fold stuff away to make room to get the stove out, with the tailgate open there was plenty of space to use it straight out of the boot.
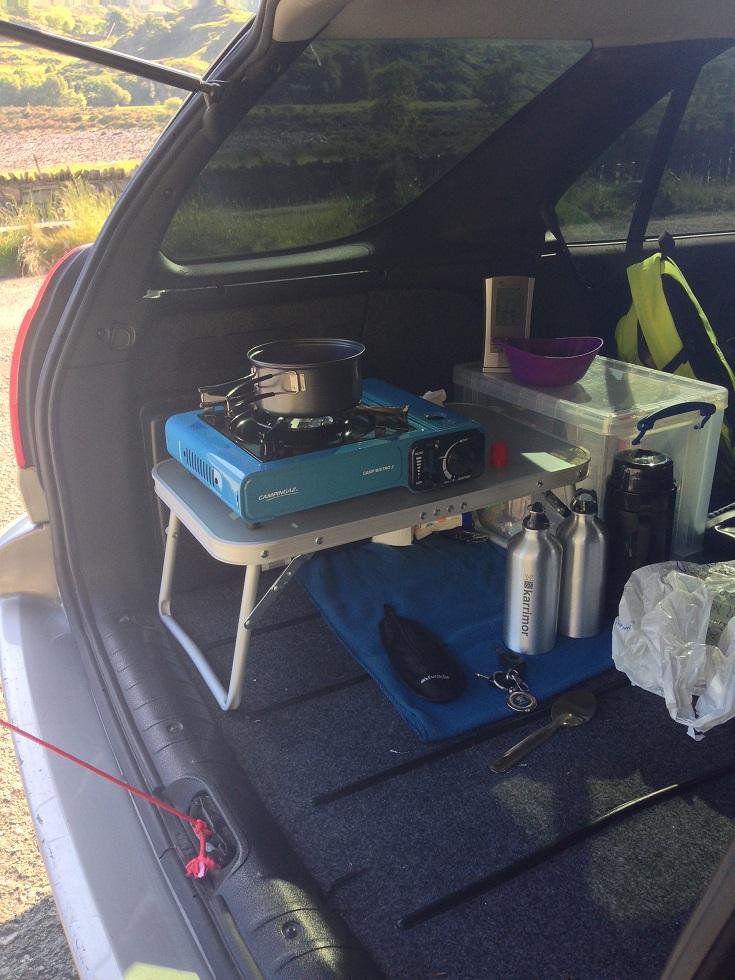
Would I car camp again? Sure probably. One or two nights was comfortable enough, frankly I think the weather was the biggest factor comfort wise (too hot).
Posts: 9
Threads: 4
Joined: May 2017
Reputation:
0
Location: Scotland
Car Model/Spec: Phase 1 Cabriolet
Thanks: 1
Given 0 thank(s) in 0 post(s)
Country: 
Really enjoyed reading this thread.. looking good! 
Posts: 112
Threads: 6
Joined: Feb 2016
Reputation:
0
Location: Surrey
Car Model/Spec: 306 Estate, TU Auto
Thanks: 0
Given 6 thank(s) in 5 post(s)
Been a while! Not much happening to be honest as frankly I've done everything I set out to do.
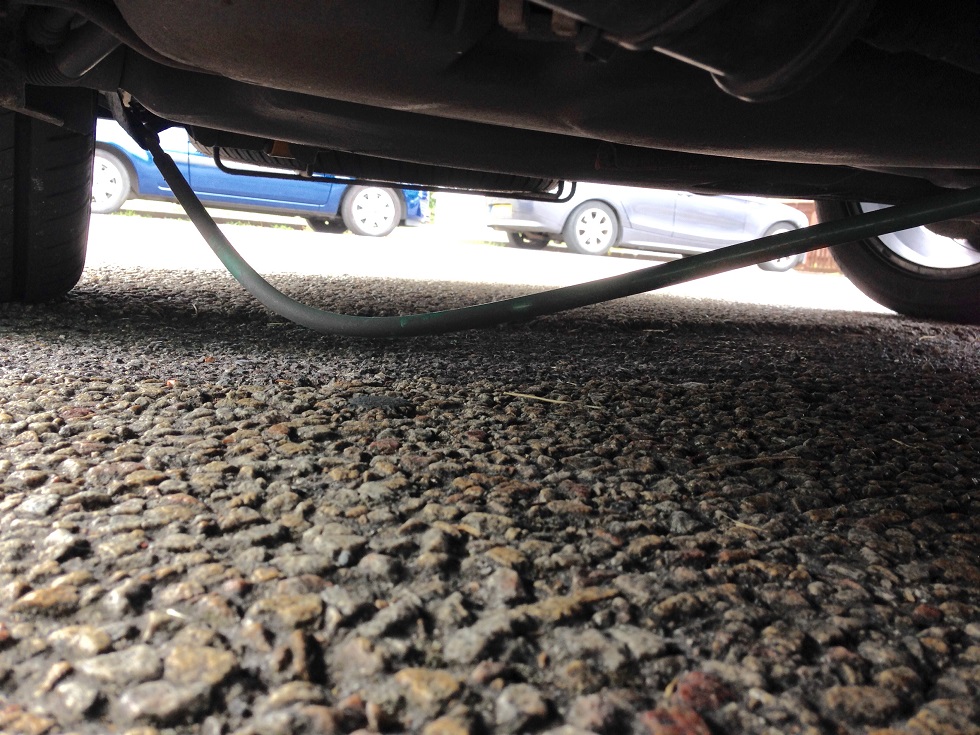
My handbrake cable came out of its carrier on one side.. 'Huh, whats the scraping noise? Oh, I think I've found the problem...' Lol
Yeah, So anyway slid it back in to its runner on the undercarriage and its fine now. I did think my actual handbrake lever was a bit slack!
Posts: 112
Threads: 6
Joined: Feb 2016
Reputation:
0
Location: Surrey
Car Model/Spec: 306 Estate, TU Auto
Thanks: 0
Given 6 thank(s) in 5 post(s)
08-08-2017, 06:52 AM
(This post was last modified: 08-08-2017, 06:53 AM by Nexus.)
Yeah.. So, you know I changed the radiator over last year? Went for a short drive on Sunday and somewhere along the trip my bottom radiator hose came loose - Dumped all the coolant (while driving I imagine).
Queue emergency stop at the roadside as I suddenly noticed my temperature gauge was off the chart and the red STOP warning was starting the light up. Fortunately I had someone nearby who was able to fetch my tools and bring them out to me - Basically the god-awful design of the cir-clip style bottom hose came loose and the pressure pushed the fitting out. Awful, crap design. Really wish I could use a jubilee clip. Car is filled back up with a mix of water/coolant temporarily until I know its solid but I don't -think- I've cooked anything. Seems alright.

Posts: 13,881
Threads: 476
Joined: Dec 2011
Reputation:
81
Location: Ipswich
Car Model/Spec: 306 Rallye
Thanks: 4
Given 104 thank(s) in 102 post(s)
only just seen the camping in the back pics. Such dedication. Great stuff 
Posts: 112
Threads: 6
Joined: Feb 2016
Reputation:
0
Location: Surrey
Car Model/Spec: 306 Estate, TU Auto
Thanks: 0
Given 6 thank(s) in 5 post(s)
11-08-2017, 05:57 PM
(This post was last modified: 11-08-2017, 06:19 PM by Nexus.)
(08-08-2017, 10:54 AM)Eeyore Wrote: only just seen the camping in the back pics. Such dedication. Great stuff 
Thanks Eeyore!
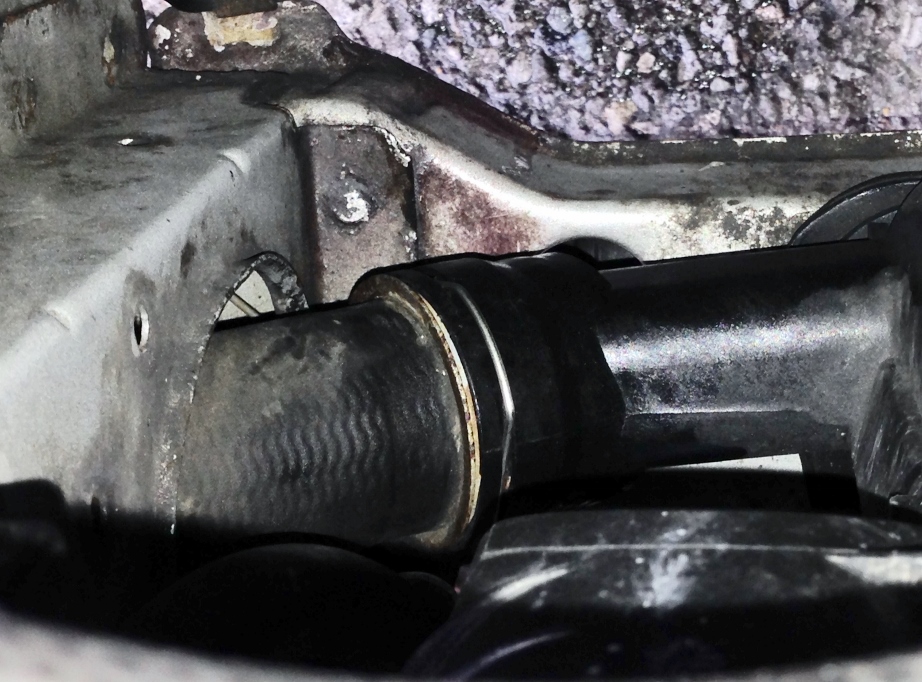
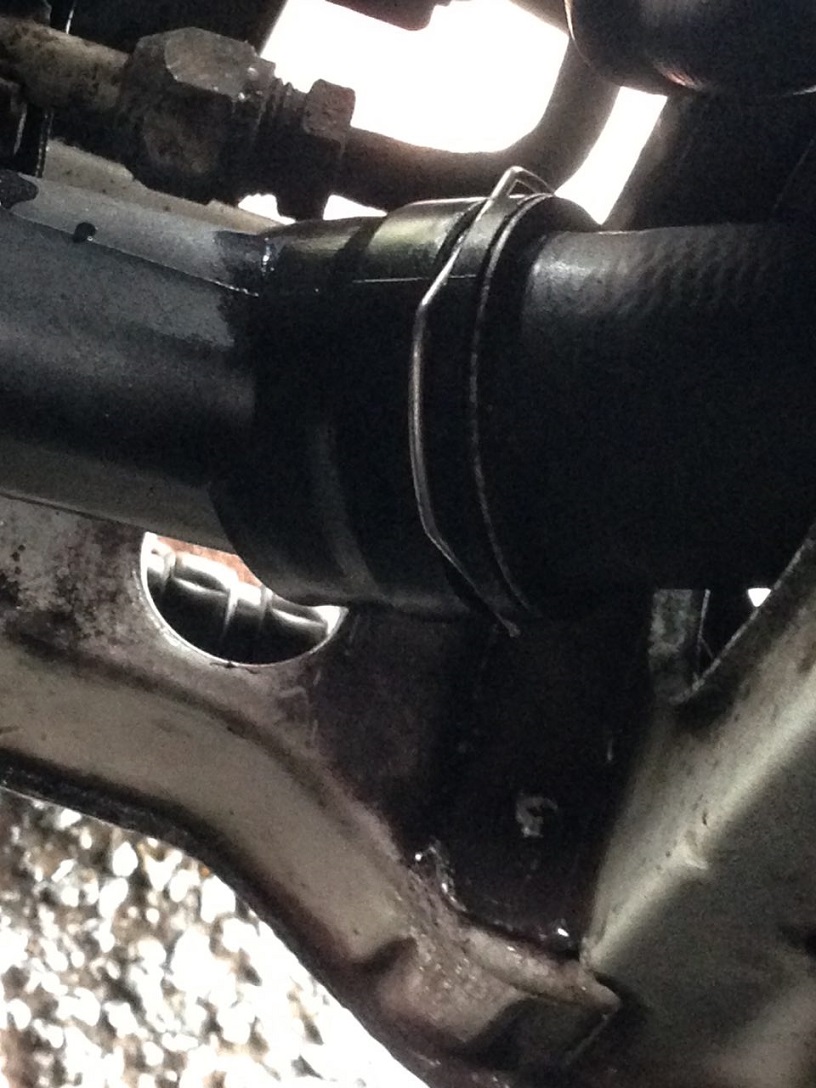
Oh wow, I've been taking it easy all week however today I needed to flush out the mostly water mix I put in the system at the roadside. Anyway, I think I've secured the bottom radiator hose again with the awful cir-clip thing. I really hope someone out there finds these pictures useful as I had a hard time finding anything remotely to do with the newer style (and bad) radiator design:
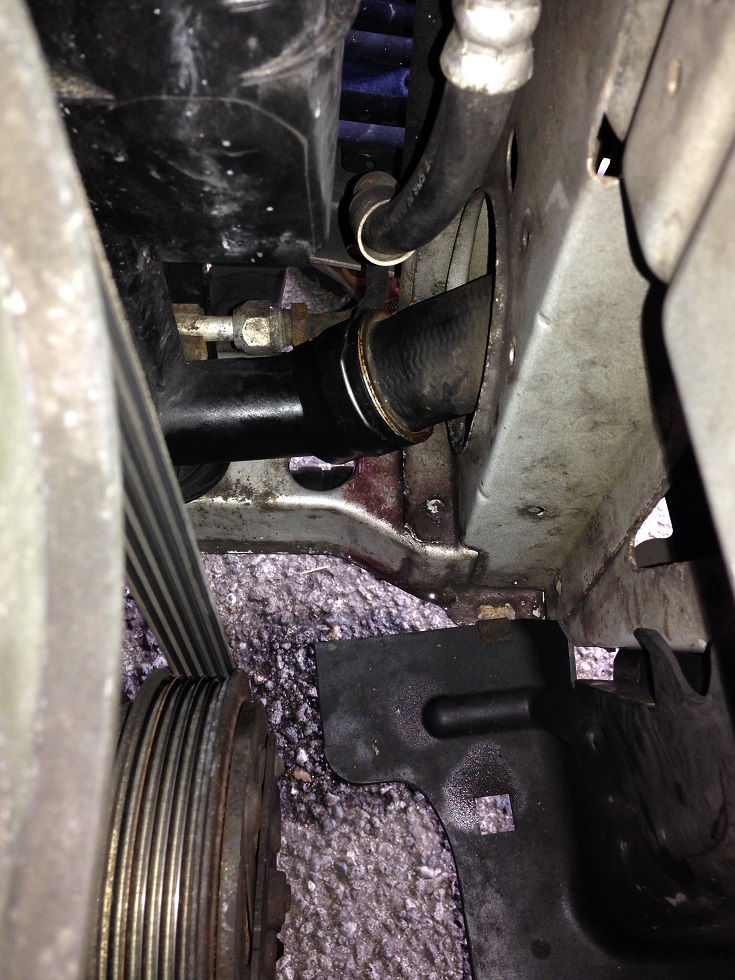
So.. Ready to put in new coolant, undo the bleed point on the engine block, took a little look through the hole - Uh Oh, more trouble:
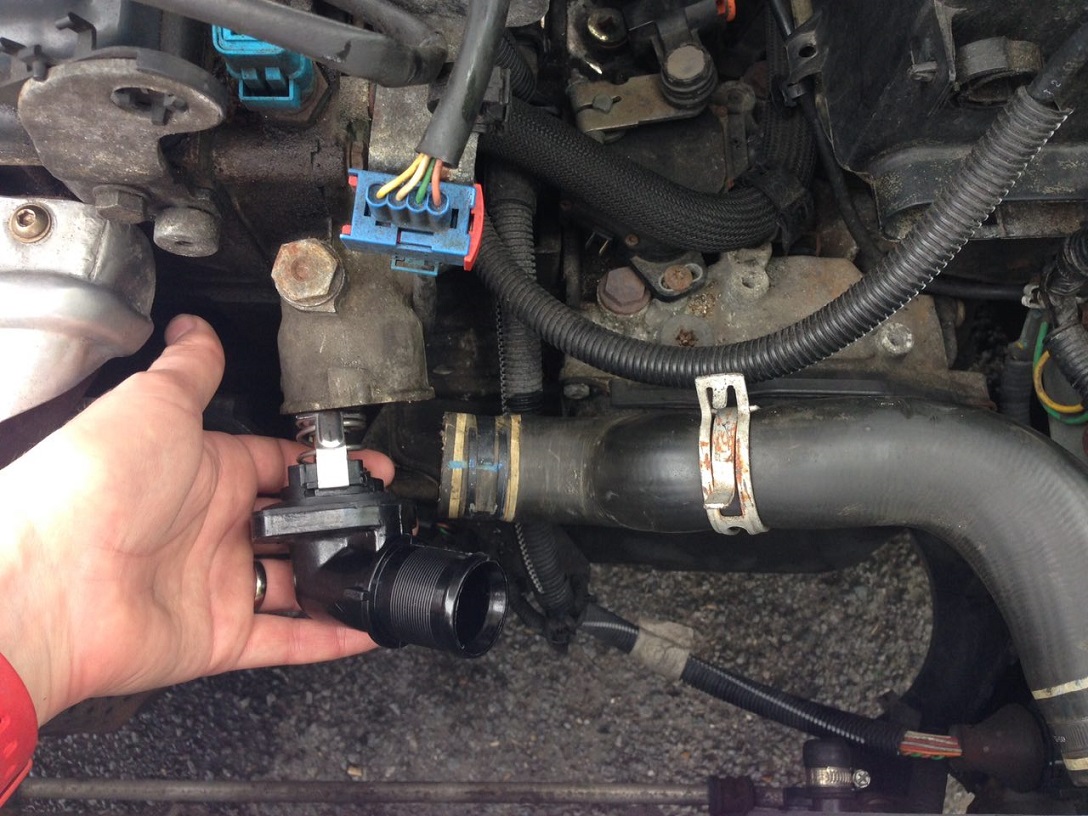
Thermostat nuked itself inside the housing. 

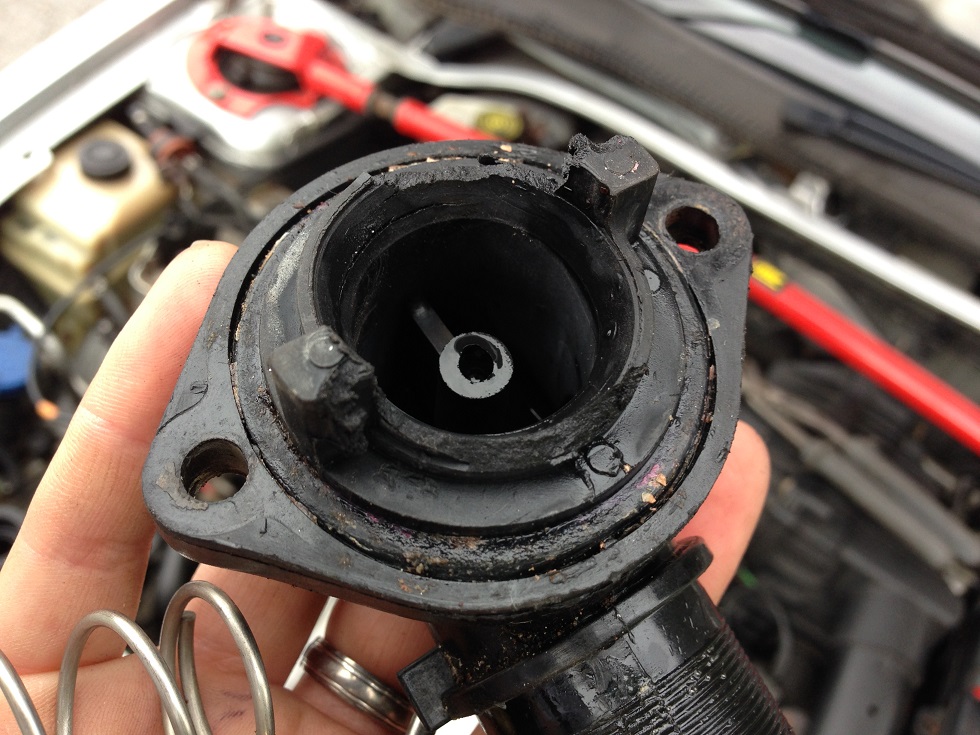
However the inside seems to be superbly clean by the look of it!

I'll have to go out tomorrow to get a new thermostat, obviously so unfortunately the car will need to stay put. I also got some new spark plugs too - I'm using Iridium ones at the moment but I'm going to stick some regular NGK ones in just to see how it runs in comparison.
Posts: 112
Threads: 6
Joined: Feb 2016
Reputation:
0
Location: Surrey
Car Model/Spec: 306 Estate, TU Auto
Thanks: 0
Given 6 thank(s) in 5 post(s)
Right.. Down to ECP for a new Thermostat, let's have another go!
Basically, after thinking about it I didn't want to put new coolant in should the rubber O-ring on the bottom radiator hose be shot. Decided to do it properly a change the O-ring while the coolant was drained. Engine bat with radiator removed and lower hose visible on the far bottom left of the bay:
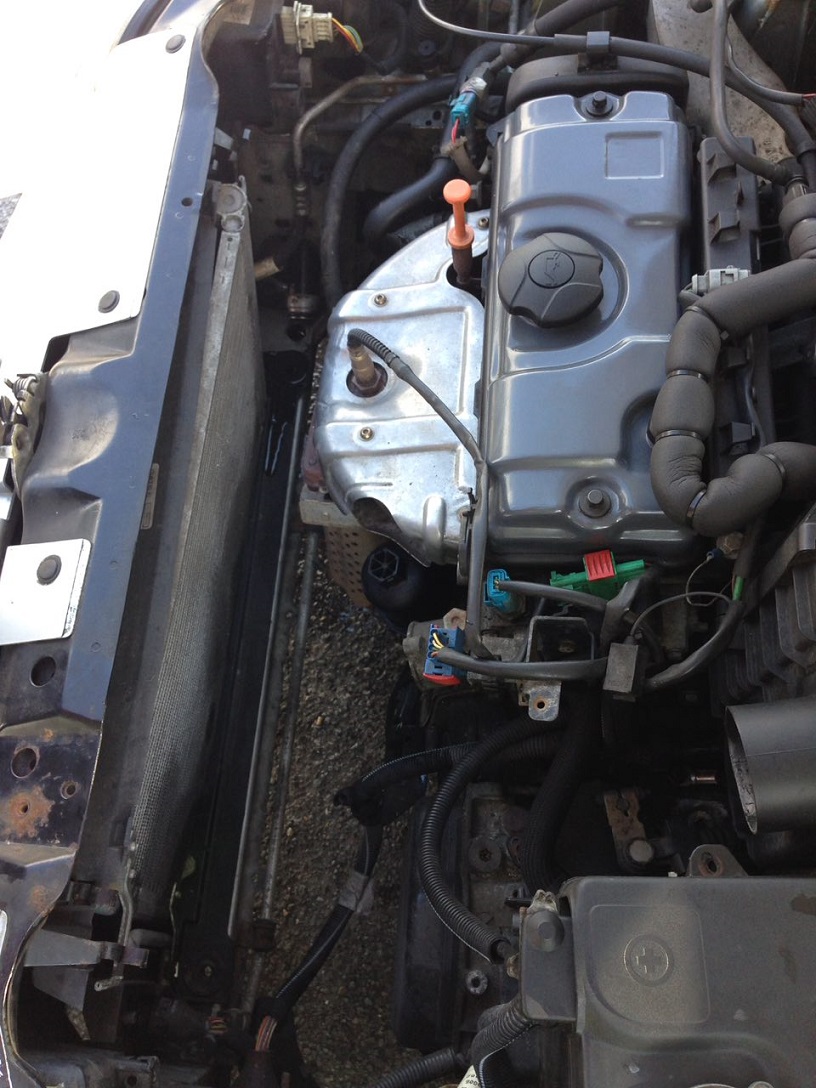
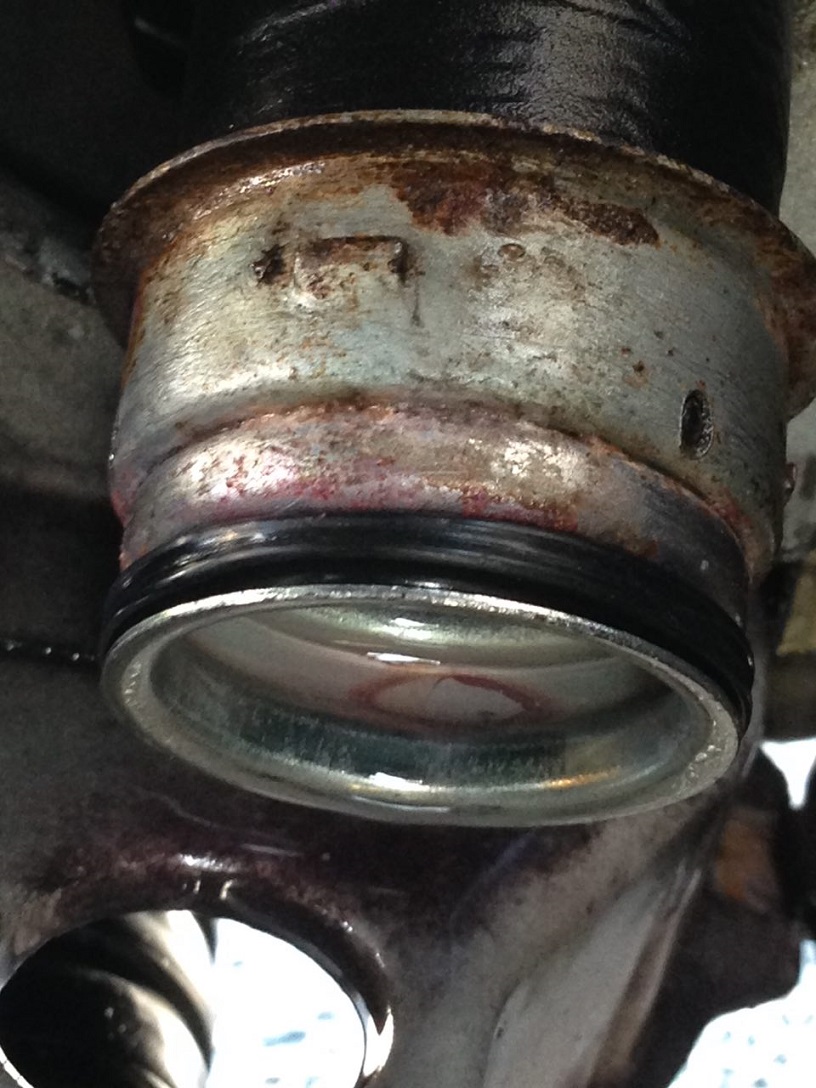
And some close up shots for you lucky folks who have one of these and aren't able to gain proper access..
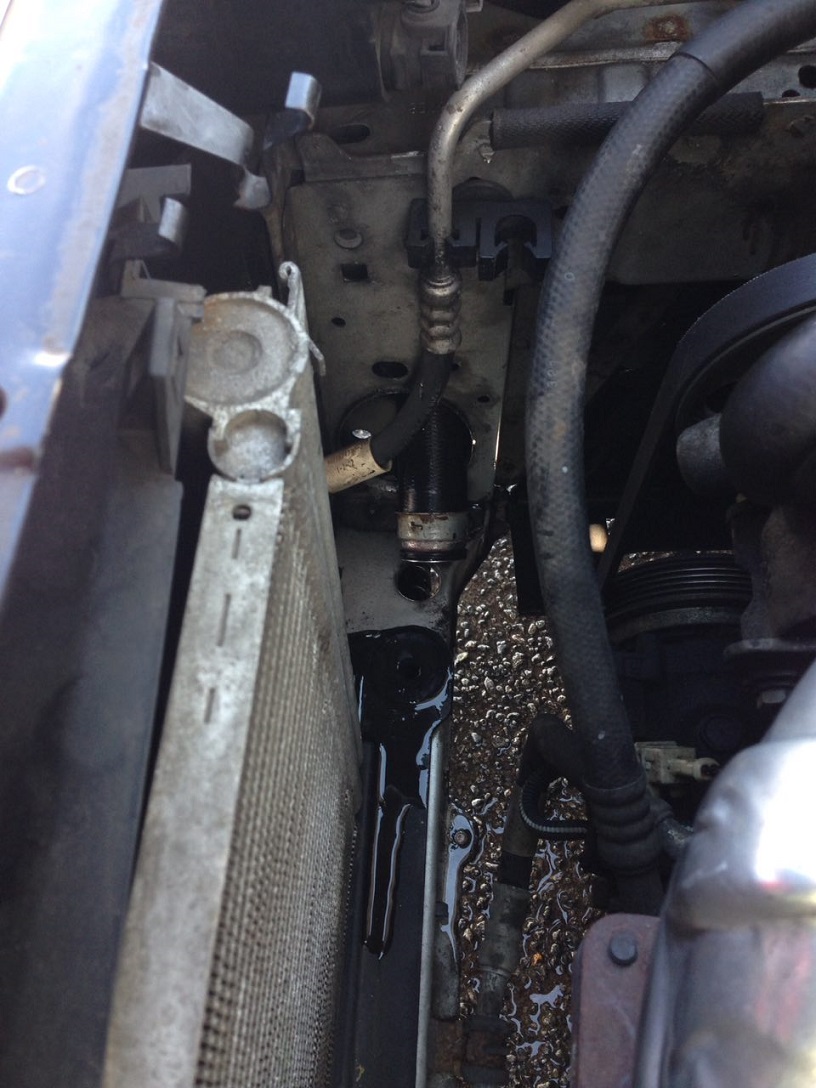
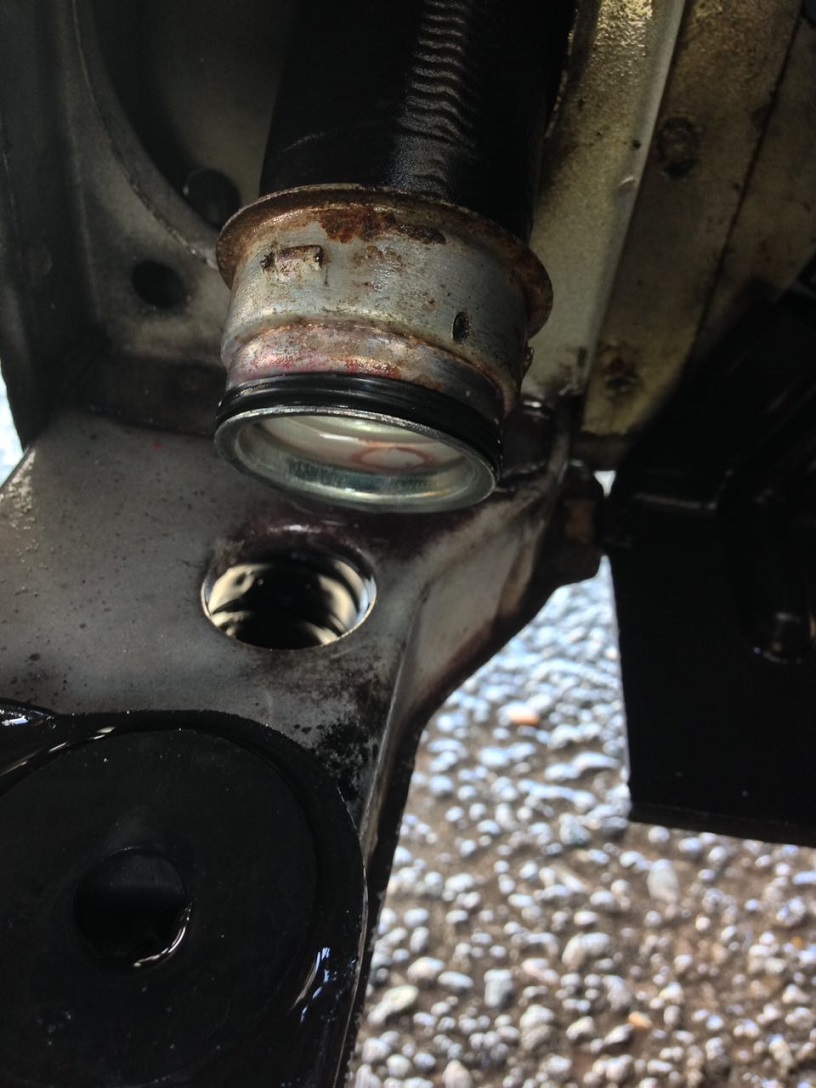
You can clearly see the O-ring and notches on the nozzle where the metal cir-clip (coming later) sits to hold the hose in place.
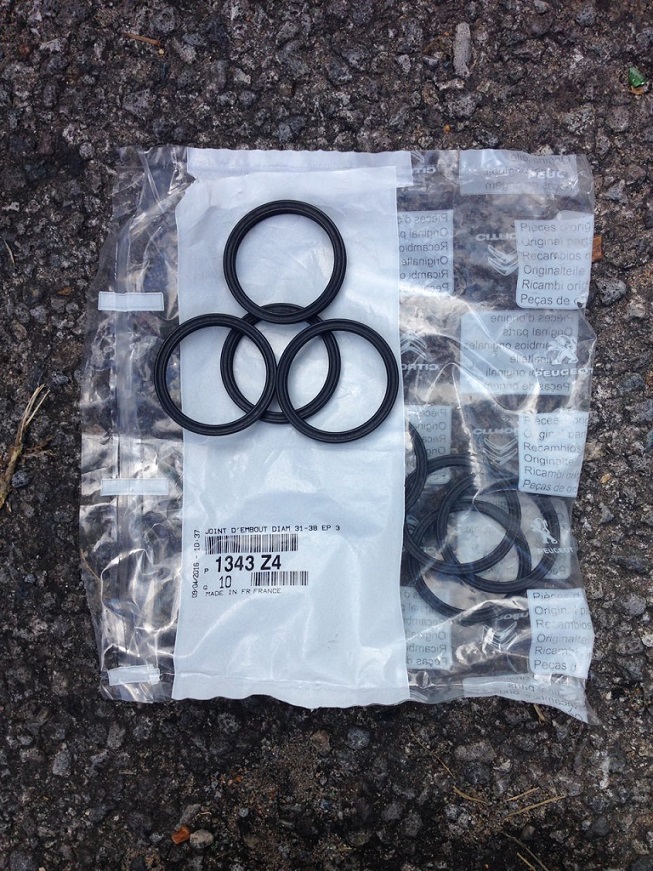
The rubber O-rings can be purchased as a genuine item, unfortunately as a pack of ten, not expensive but just inconvenient. If you need one just drop me a private message.
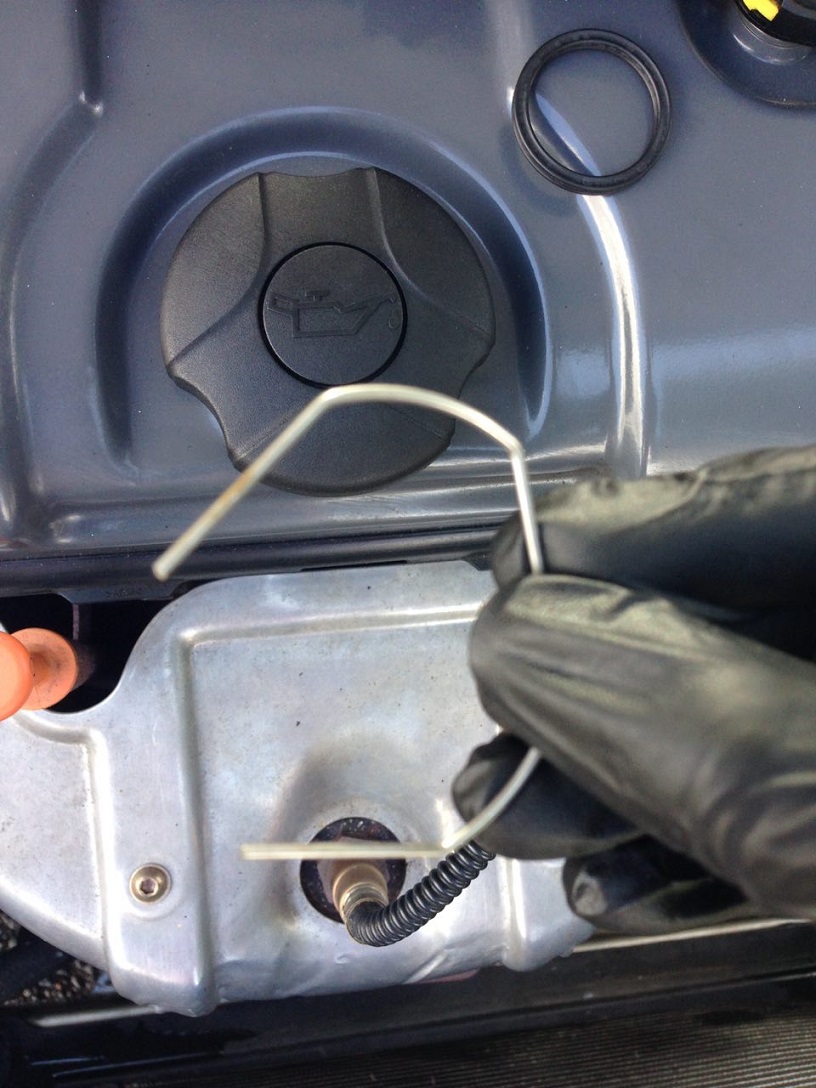
The cir-clip that goes on the radiator to secure the hose in place.  (This should come with your newly purchased radiator)
Nozzle cleaned with wire brush, new O-ring on, replace your radiator same as removing and then secure with cir-clip.
Self explanatory - New thermostat.
Final task of checking all your points of possible leaks before filling up and bleeding (Just shout if you need info on bleeding but I'm sure most know what they are doing!). I use a no-spill funnel which also acts as the header/expansion tank and helps with bleeding. It comes with a plunger to plug the hole when your'e finished so minimal spillage when your funnel still has fluid in it like below:

Posts: 112
Threads: 6
Joined: Feb 2016
Reputation:
0
Location: Surrey
Car Model/Spec: 306 Estate, TU Auto
Thanks: 0
Given 6 thank(s) in 5 post(s)
I just cant leave the thing alone! :O
I've been having a noticeable tapping from the top end - I had a few small things on my list of things to do: Check the lifters, tappets etc for anything visual / obvious. Change the spark plugs, get an inspection scope down in the the cylinders for well.. why not, sh*ts and giggles so to speak.
More images that i hope will be useful for anyone else with a TU5JP engine.
Rocker cover off, coil pack and breather hose also removed:
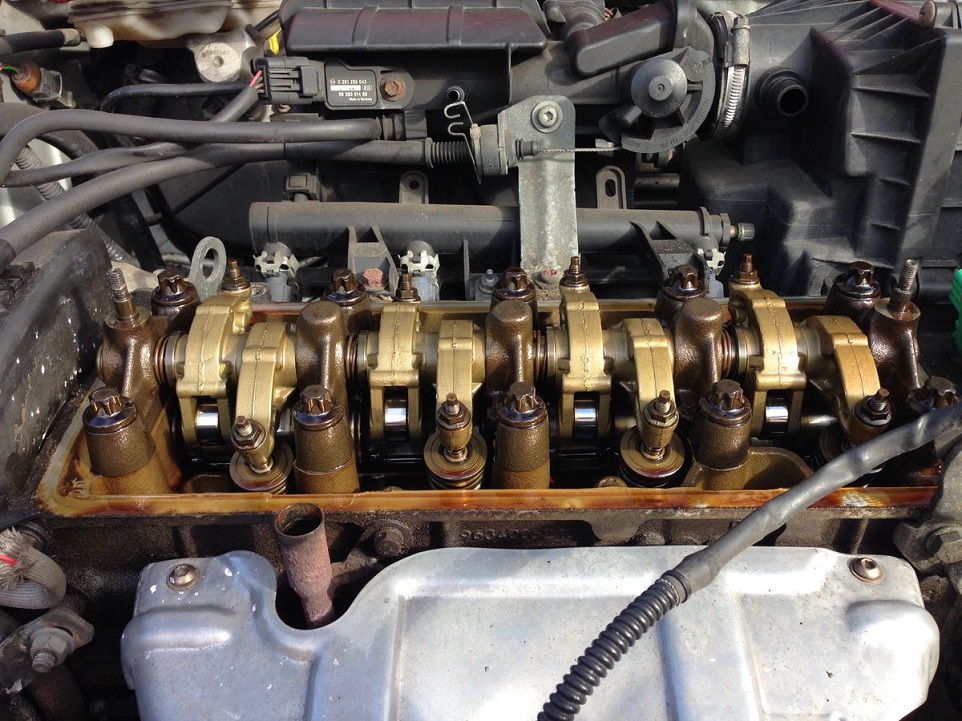
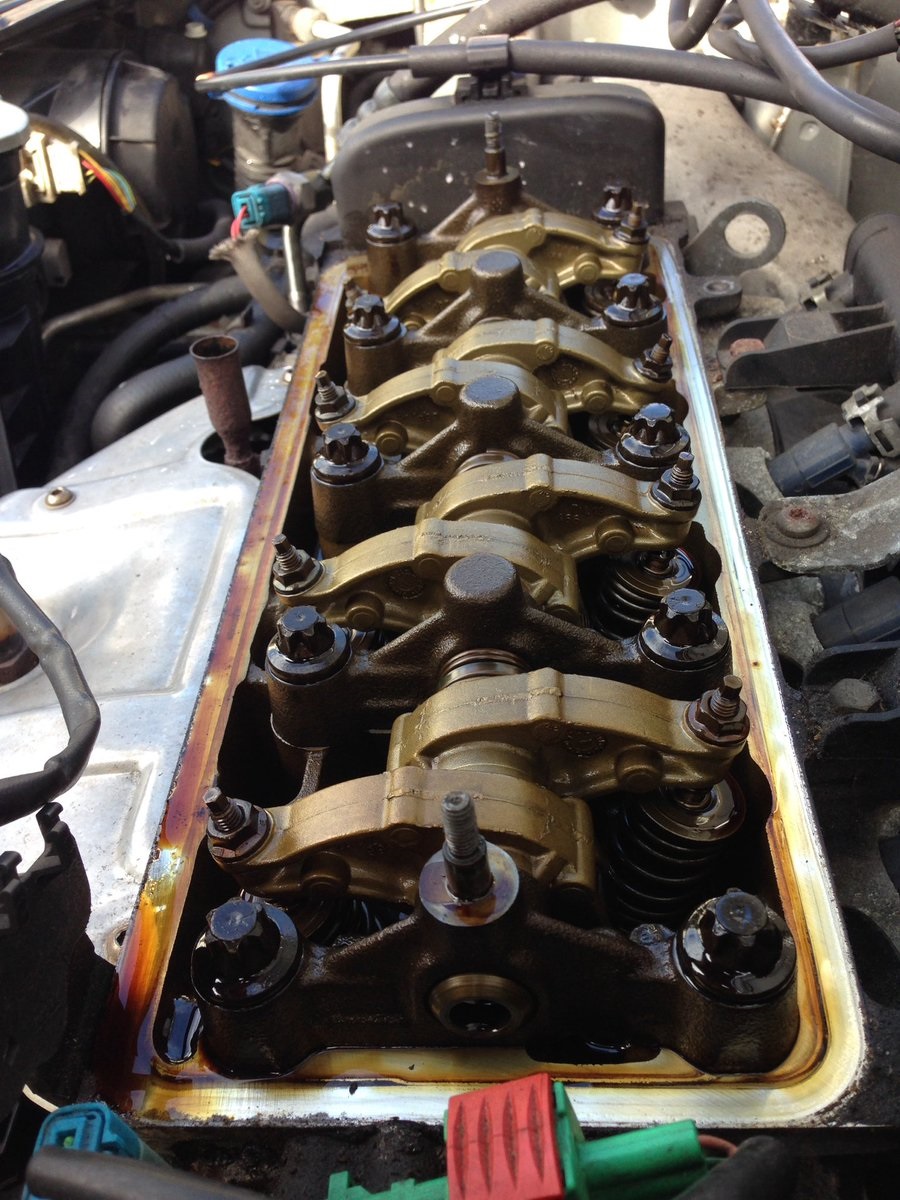
The Denso IK20 Iridium plugs after about.. 20k miles. Technically they should last far longer but I was getting noises I didn't like so as a process of elimination I've stuck in standard copper NGK plugs. The clacking / tapping while cold seems to have been significantly reduced after going back to fresh coppers.
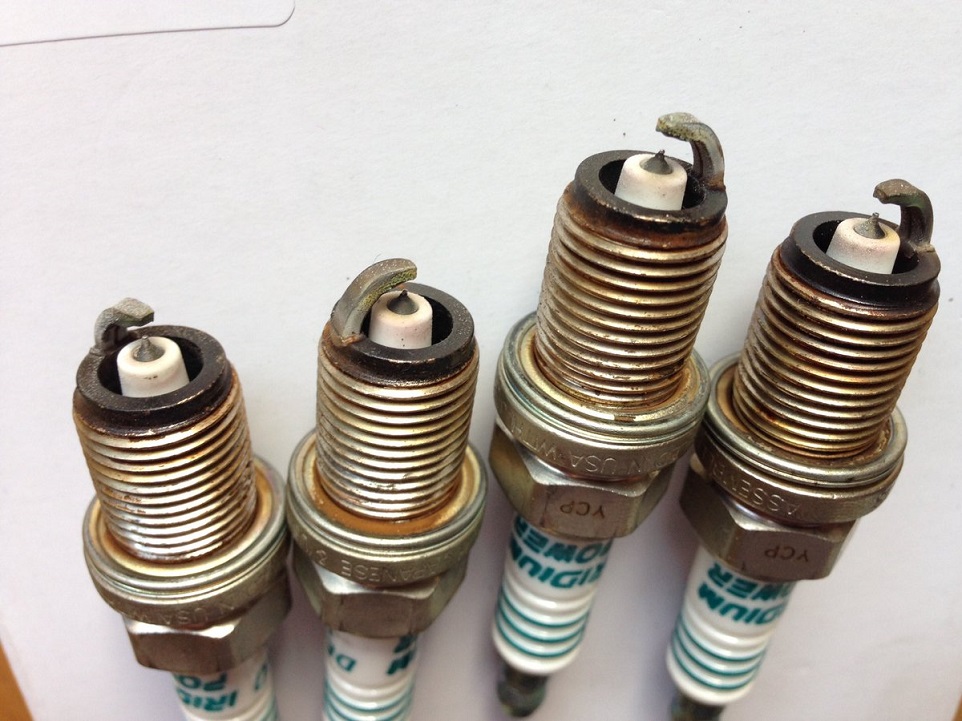
Also.. Here's something you don't see every day!
Starting from cylinder nearest to cambelt, going across:
1.

Posts: 112
Threads: 6
Joined: Feb 2016
Reputation:
0
Location: Surrey
Car Model/Spec: 306 Estate, TU Auto
Thanks: 0
Given 6 thank(s) in 5 post(s)
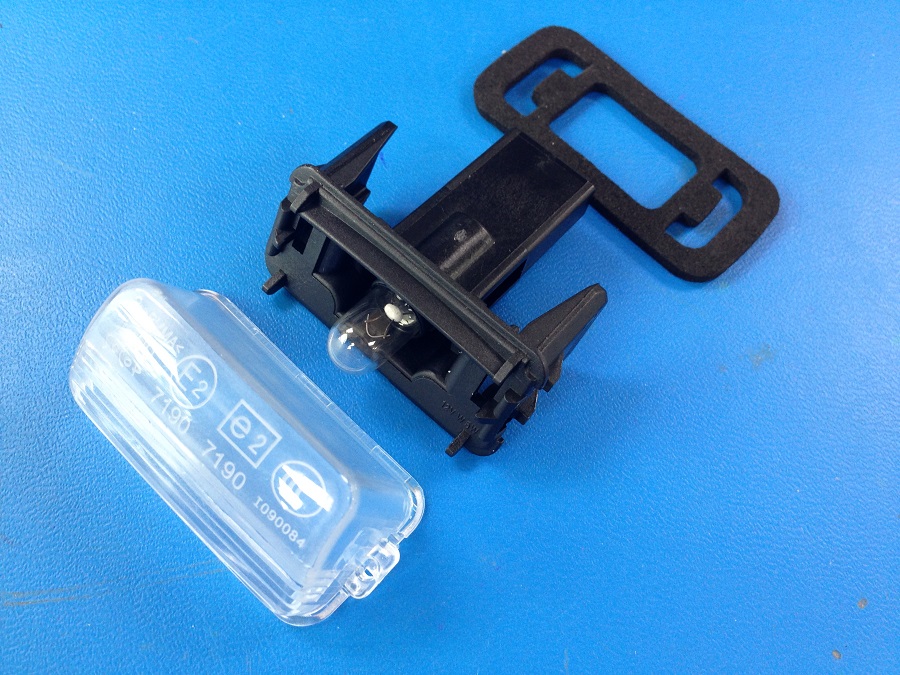
Couple of blown bulbs on the rear - One reverse light and also a number plate bulb. To be frank, I was a bit impatient in trying to work out how the number plate bulb housing came off, resulting in me snapping it straight off. Good ol' fifteen year old brittle plastic.

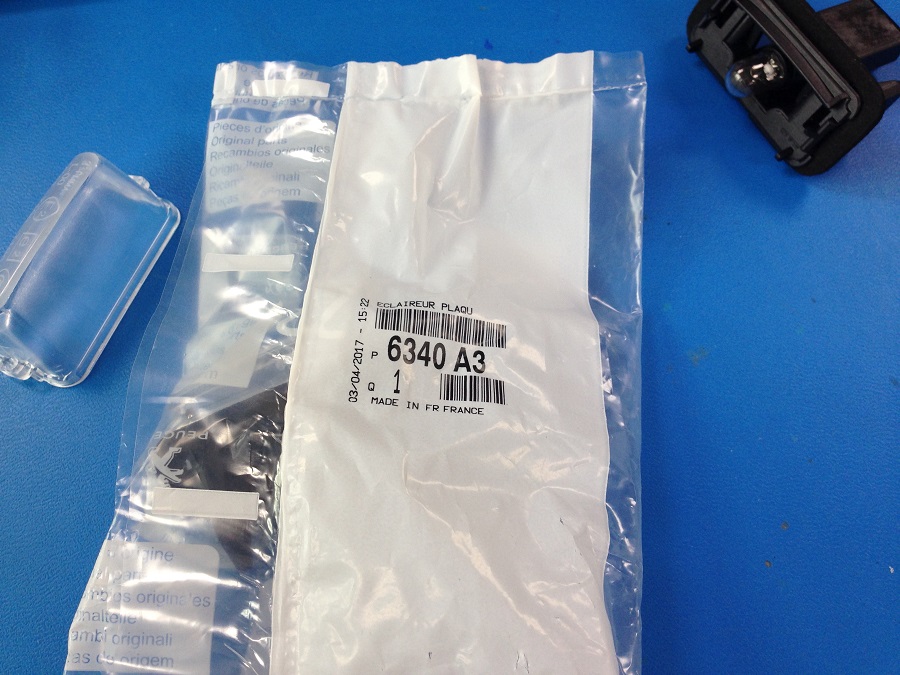
Found some replacements on flea-bay for £7 a pair, with bulbs included! Quite a steal I think. Part number 6340A3 and is supposedly compatible with both hatchback and estates. Nice fresh, unmarred plastic. You'll have to remove the plastic liner on your tailgate to access the wiring/clips but a very simple drop in replacement.
Posts: 13,881
Threads: 476
Joined: Dec 2011
Reputation:
81
Location: Ipswich
Car Model/Spec: 306 Rallye
Thanks: 4
Given 104 thank(s) in 102 post(s)
Bargain on those rear lights. They used to be difficult to find but there seems to be new stock around at the moment. With the spark plugs it may have been that one was loose? Try putting the old ones back in and see what happens?
Posts: 1,022
Threads: 52
Joined: Apr 2017
Reputation:
4
Location: Bath/Bristol
Car Model/Spec: XSi 16v
Thanks: 3
Given 83 thank(s) in 81 post(s)
Top end of engine looks very clean Nex. In my limited experience (Mini's), I always found manually adjusted tappets quite rattly.
The bores seem to still have the cross-hatching on them!
Posts: 112
Threads: 6
Joined: Feb 2016
Reputation:
0
Location: Surrey
Car Model/Spec: 306 Estate, TU Auto
Thanks: 0
Given 6 thank(s) in 5 post(s)
13-10-2017, 07:42 PM
(This post was last modified: 13-10-2017, 07:50 PM by Nexus.)
(10-10-2017, 10:31 AM)Eeyore Wrote: Bargain on those rear lights. They used to be difficult to find but there seems to be new stock around at the moment. With the spark plugs it may have been that one was loose? Try putting the old ones back in and see what happens?
(10-10-2017, 12:21 PM)Mighty306 Wrote: Top end of engine looks very clean Nex. In my limited experience (Mini's), I always found manually adjusted tappets quite rattly.
The bores seem to still have the cross-hatching on them!
Thanks for the replies - I'm running out of things to do with it tbh. I'm thinking about dabbling with some soundproofing next. Underneath the front footwells, arches and doors. Possibly the boot floor as well. Obviously it doesn't surprise but since getting the Bilstein and 195/50 Pilot Sports on, the ride has been pretty harsh. Anything to make longer journeys that little bit more enjoyable.
Gonna give the pug a 'Winter Detail' over the weekend, usually give it a full clay bar, polish and wax every six months. However I'm also going to give the windows a polishing with some Autoglym Glass Polish, essentially claying for your windows. Used it on a couple of windscreens already and its been good.
So.. I got a bit carried away with my detailing collection:
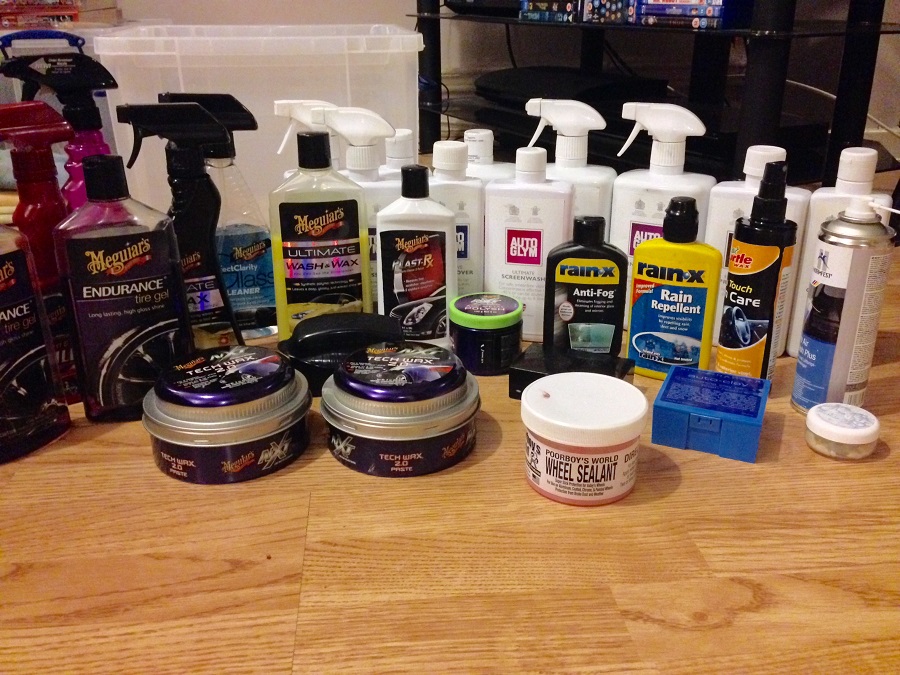
A lot of the time I was sceptical about cleaning, you know.. Two days later and its dirty again etc. But no.. You gotta clay it, polish it, wax it/seal it. Usually takes me about four or five passes over the entire car before I'm done and it's absolutely amazing when it does finally rain and it all just rolls straight off like a wet suit. Very much recommend claying before waxing.
I'll post a proper list of products if anyone is interested.
Posts: 112
Threads: 6
Joined: Feb 2016
Reputation:
0
Location: Surrey
Car Model/Spec: 306 Estate, TU Auto
Thanks: 0
Given 6 thank(s) in 5 post(s)
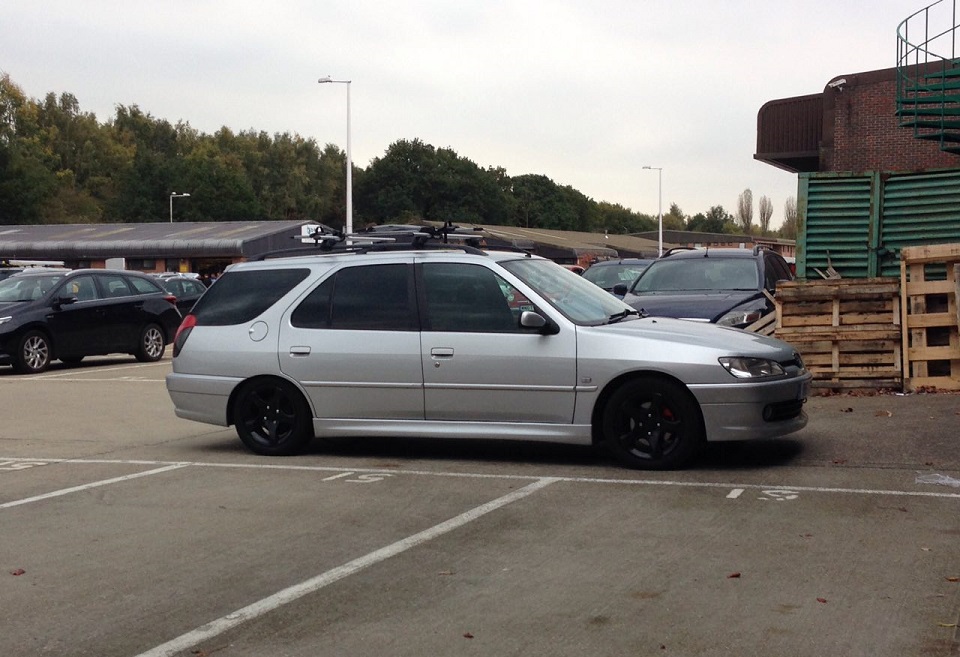
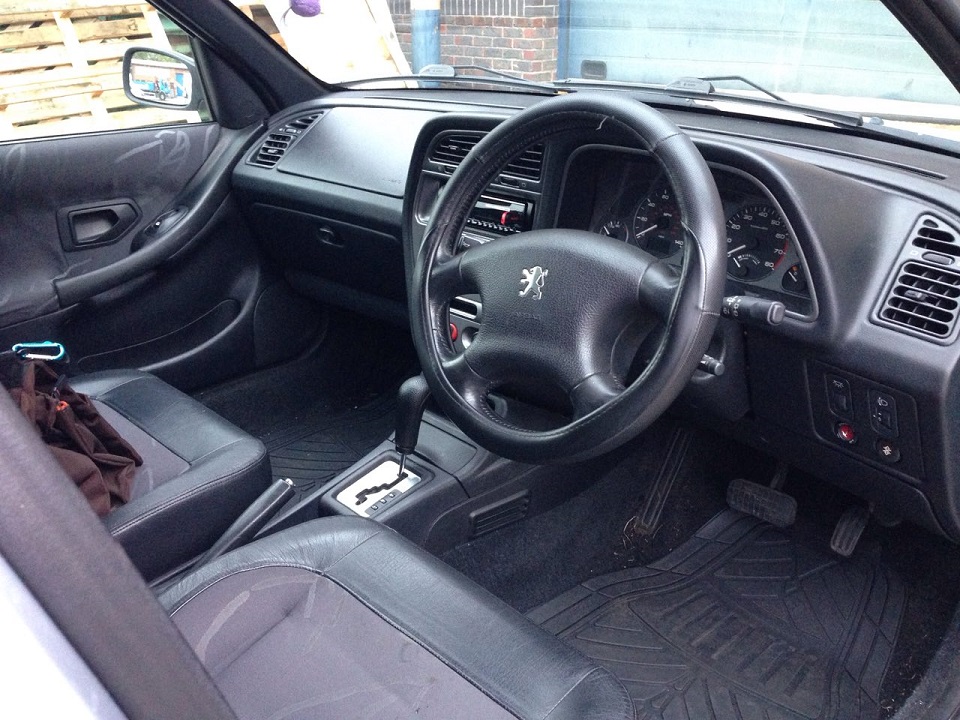
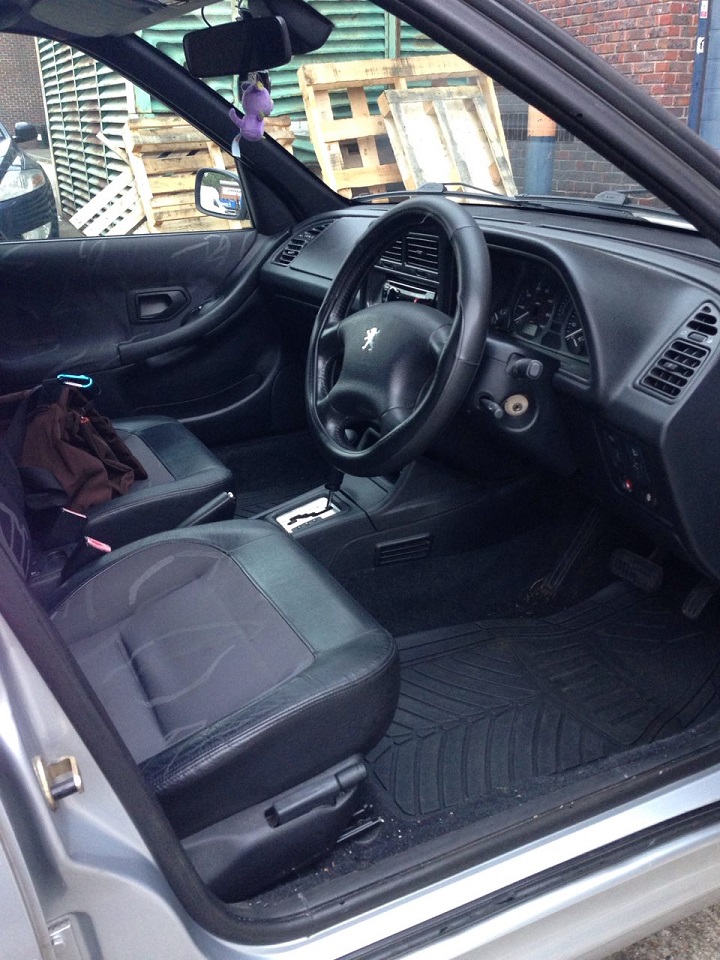
Just a couple of generic photos.
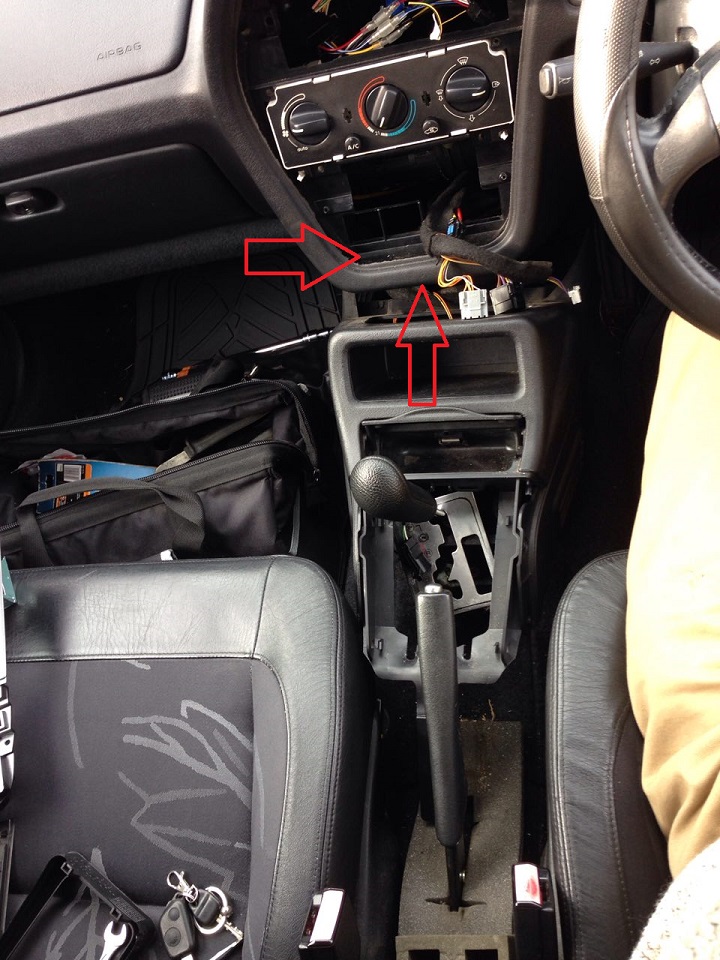
I was also recently trying to locate the Central Locking Module, I know on previous phases it's underneath the rear seat but not on this Phase 3! I tracked down the relay to somewhere behind the dash and eventually located it in the centre controls area, right at the very bottom - However it's hidden underneath a plastic panel and I cant seem to get my hands in there. I didn't have a huge amount of time so was not successful in getting in out on this occasion. I'll try again sometime when I can remove the dash properly.
For anyone who needs to know, the reversing sensor module is located near the tailgate, behind the plastic panel where your scissor jack and tyre iron is.
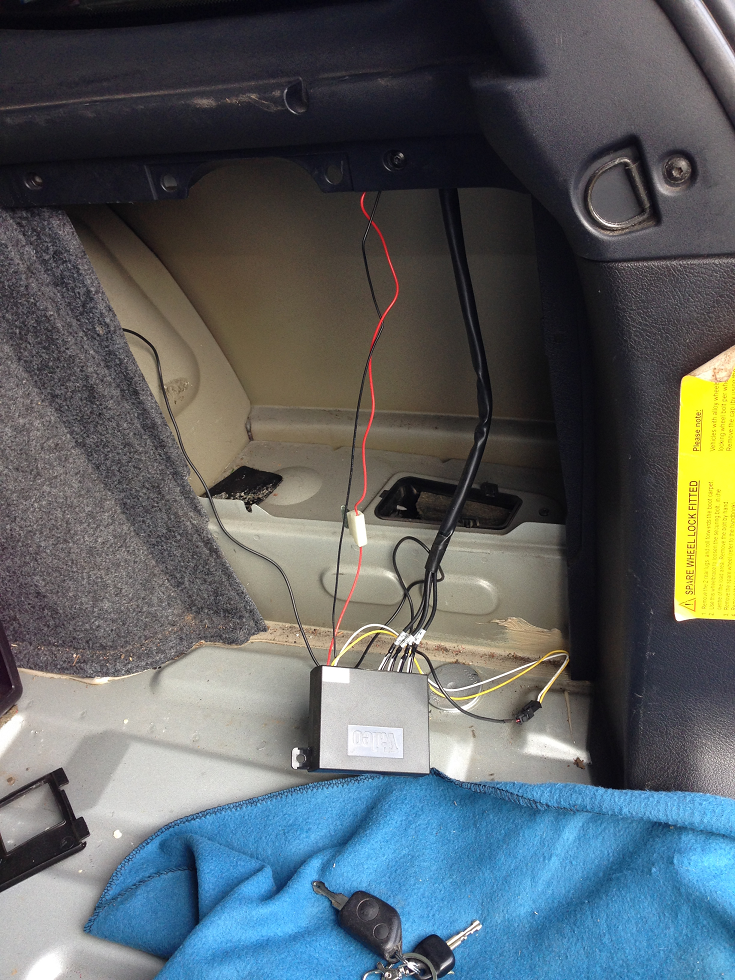
I originally had all the boot carpets up to see what the panels are like underneath (I'd like to sound proof a bit more) but ended up doing extra stuff like checking the arches/pillars for rust.
Posts: 112
Threads: 6
Joined: Feb 2016
Reputation:
0
Location: Surrey
Car Model/Spec: 306 Estate, TU Auto
Thanks: 0
Given 6 thank(s) in 5 post(s)
02-12-2017, 07:02 PM
(This post was last modified: 02-12-2017, 07:10 PM by Nexus.)
Just started getting a real loud creaking from the rear axle over the last couple of days when going over speed bumps, as little as >10-5mph - I do seem to have a bit of camber going on as well. Would anyone know whether this would be an issue with the rear beam needing replacement?  This is a 105k mileage car afterall.
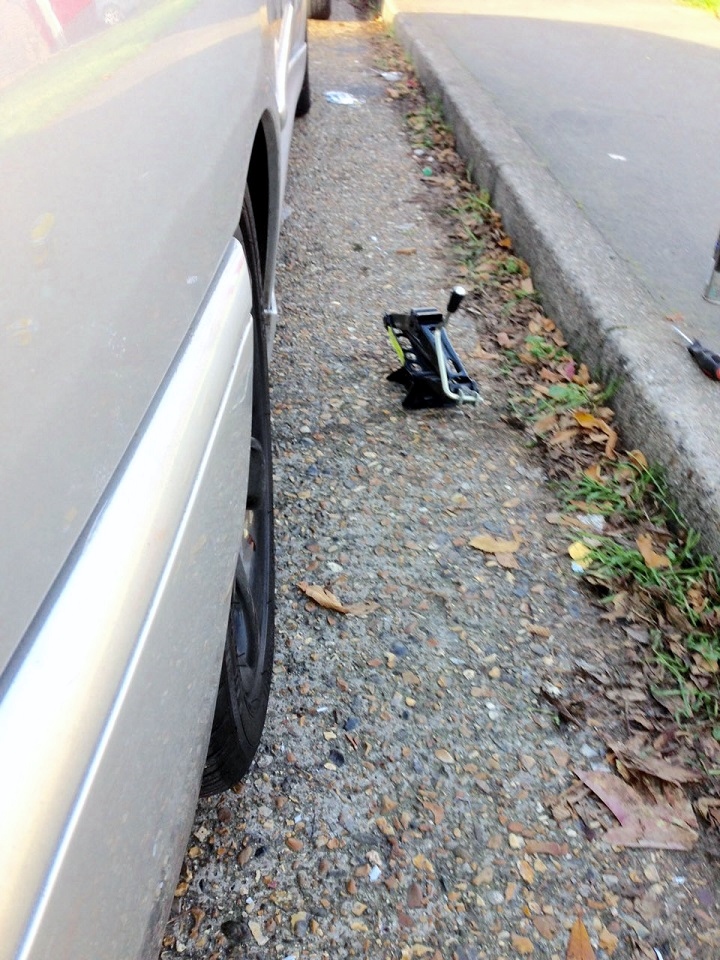
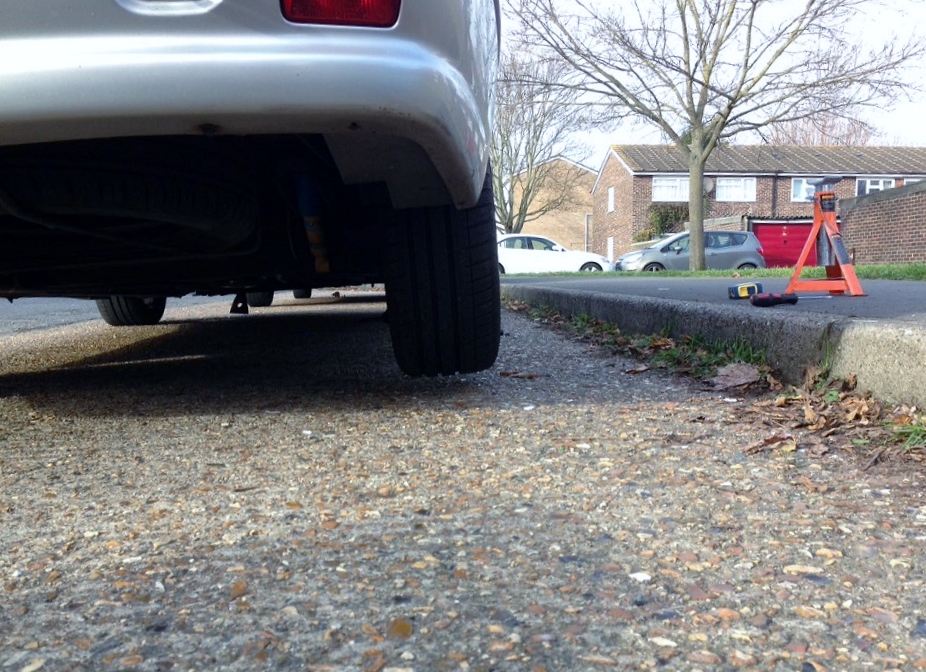
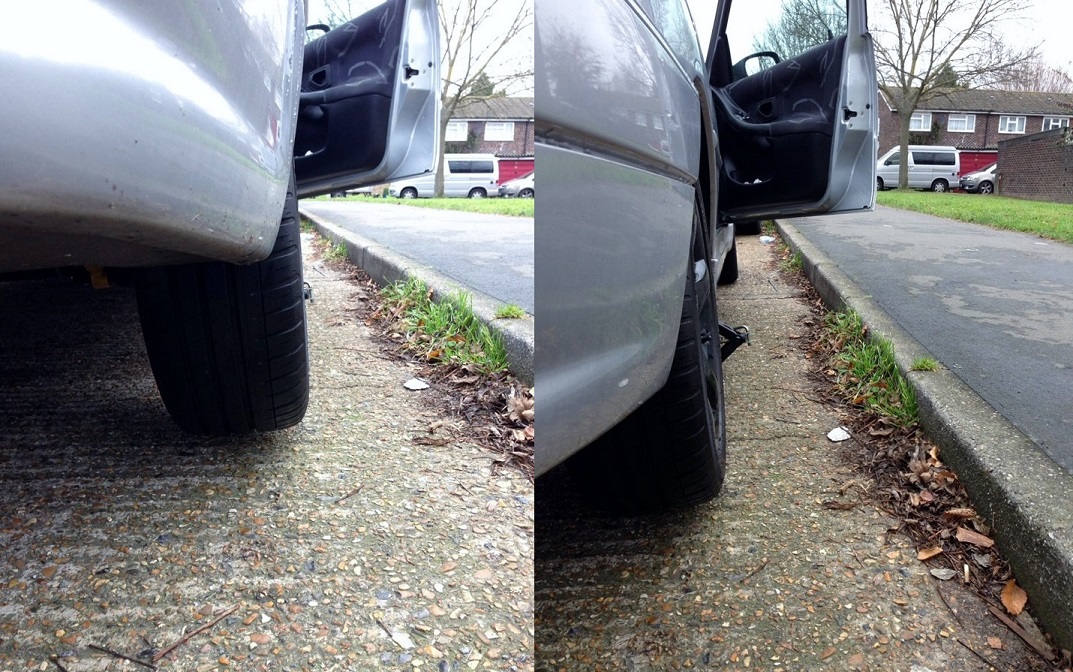
Now I've had the car lowered since February 17, and I know I've had a wee bit of camber - If my wheels were dead straight, they'd be rubbing on the rear arches. Could the creaking be a result of the Bilstein shock bushes being harder in the cold weather?
Posts: 1,022
Threads: 52
Joined: Apr 2017
Reputation:
4
Location: Bath/Bristol
Car Model/Spec: XSi 16v
Thanks: 3
Given 83 thank(s) in 81 post(s)
Looks like camber from dead bearings I'm afraid. Are the tyres scrubbed on their inner edges too?
Posts: 112
Threads: 6
Joined: Feb 2016
Reputation:
0
Location: Surrey
Car Model/Spec: 306 Estate, TU Auto
Thanks: 0
Given 6 thank(s) in 5 post(s)
(02-12-2017, 08:12 PM)Mighty306 Wrote: Looks like camber from dead bearings I'm afraid. Are the tyres scrubbed on their inner edges too?
Thanks for the reply, luckily I have a week off at the moment so I'll get it inspected properly.
Posts: 112
Threads: 6
Joined: Feb 2016
Reputation:
0
Location: Surrey
Car Model/Spec: 306 Estate, TU Auto
Thanks: 0
Given 6 thank(s) in 5 post(s)
Couple of better shots taken today, just wanted to double check before calling the garage and getting in. It handles fine but something definitely isn't right. I'll be taking it in during this week. I'm going under the impression that the bearings are shot but to be honest, if it needs a new axle, so be it. May as well go whole hog.
Posts: 1,663
Threads: 62
Joined: Jul 2012
Reputation:
10
Location: Rugby, Warwickshire
Car Model/Spec: Golf 7 GTD : LBSC Rallye
Thanks: 0
Given 11 thank(s) in 11 post(s)
04-12-2017, 08:14 PM
(This post was last modified: 04-12-2017, 08:14 PM by C2K.)
Very tidy car, a credit to your work.
If you ever fit the most retarded lower radiator hose in the world again, a thin smear of Vaseline or lithium Grease on the outside of the o ring will let it slip home nicely. The issue is that the o ring rolls over as you fit it so it is trying to push out. I had this happen on my rallye and it cooked the head after dumping my coolant. An expensive lesson.
The beam looks to be on its way out. I wouldn't just take it to Joe bloggs garage as they won't know Wtf to do. Get in touch with Jord or Stef who can do you an exchange axle and probably fit it for a fee. Will outlast the car then.
Night Blue VW Golf 7 GTD : Bianca 306 Rallye : Mini Cooper D (The Mrs')
![[Image: wallye-gtd.JPG?raw=1]](https://www.dropbox.com/s/pcxk1pgpaucznvr/wallye-gtd.JPG?raw=1)
HDi Owner for 200k/9 years
Posts: 112
Threads: 6
Joined: Feb 2016
Reputation:
0
Location: Surrey
Car Model/Spec: 306 Estate, TU Auto
Thanks: 0
Given 6 thank(s) in 5 post(s)
05-12-2017, 12:52 PM
(This post was last modified: 05-12-2017, 12:56 PM by Nexus.)
(04-12-2017, 08:14 PM)C2K Wrote: The beam looks to be on its way out. I wouldn't just take it to Joe bloggs garage as they won't know Wtf to do. Get in touch with Jord or Stef who can do you an exchange axle and probably fit it for a fee. Will outlast the car then.
I've had previous work such as the braided brakes and suspension fitting done by Pug1Off in Brackley. In my own personal experience I've had good dealings with them. Will be handing the car over tomorrow for them to inspect the condition of the current axle, whether it's worth changing just the bearings, or changing the whole thing outright. With 100k Miles on it, I'd rather just do a straight swap and get the whole thing replaced - Will await their diagnosis!
Posts: 1,663
Threads: 62
Joined: Jul 2012
Reputation:
10
Location: Rugby, Warwickshire
Car Model/Spec: Golf 7 GTD : LBSC Rallye
Thanks: 0
Given 11 thank(s) in 11 post(s)
How did you get on?
Night Blue VW Golf 7 GTD : Bianca 306 Rallye : Mini Cooper D (The Mrs')
![[Image: wallye-gtd.JPG?raw=1]](https://www.dropbox.com/s/pcxk1pgpaucznvr/wallye-gtd.JPG?raw=1)
HDi Owner for 200k/9 years
Posts: 112
Threads: 6
Joined: Feb 2016
Reputation:
0
Location: Surrey
Car Model/Spec: 306 Estate, TU Auto
Thanks: 0
Given 6 thank(s) in 5 post(s)
Posts: 1,663
Threads: 62
Joined: Jul 2012
Reputation:
10
Location: Rugby, Warwickshire
Car Model/Spec: Golf 7 GTD : LBSC Rallye
Thanks: 0
Given 11 thank(s) in 11 post(s)
Brown trousers moment and some choice words there..
Night Blue VW Golf 7 GTD : Bianca 306 Rallye : Mini Cooper D (The Mrs')
![[Image: wallye-gtd.JPG?raw=1]](https://www.dropbox.com/s/pcxk1pgpaucznvr/wallye-gtd.JPG?raw=1)
HDi Owner for 200k/9 years
Posts: 112
Threads: 6
Joined: Feb 2016
Reputation:
0
Location: Surrey
Car Model/Spec: 306 Estate, TU Auto
Thanks: 0
Given 6 thank(s) in 5 post(s)
Just a quickie, had the MOT done last week, technically it failed on headlight alignment (slightly low) but all in all - All sound and good to go! 
Posts: 112
Threads: 6
Joined: Feb 2016
Reputation:
0
Location: Surrey
Car Model/Spec: 306 Estate, TU Auto
Thanks: 0
Given 6 thank(s) in 5 post(s)
Brrrr Chilly!

Posts: 13,881
Threads: 476
Joined: Dec 2011
Reputation:
81
Location: Ipswich
Car Model/Spec: 306 Rallye
Thanks: 4
Given 104 thank(s) in 102 post(s)
oh wow that U turn is spectacular! D:
Posts: 112
Threads: 6
Joined: Feb 2016
Reputation:
0
Location: Surrey
Car Model/Spec: 306 Estate, TU Auto
Thanks: 0
Given 6 thank(s) in 5 post(s)
21-09-2018, 07:32 PM
(This post was last modified: 21-09-2018, 07:35 PM by Nexus.)
So I've got the cambelt done and had the engine bay steam cleaned of all oil misting/contamination in order to keep an eye on the exterior of the engine and pin point any leaks - TLDR; Turns out that cleaning the misted oil off, I've discovered that the HG has gone. The HG has now been agitated from the cleaning and oil is now exiting from the head cylinder. So yeh now the whole lot has to come off again!
Recall what happened last year.. Around July 2017? I was out driving and the bottom retaining clip for the radiator hose came off, I lost ALL my coolant. It's only until now that it's clicked, my engine bay only begun getting grimy after that incident so it is no surprise whatsoever that I've probably cooked the head gasket last year and I've been driving around for over a year with a teeny tiny oil leak. The misting of the oil had in essence created a seal.
Good news at the end of the day, at least I still have the opportunity to have it repaired before it was any worse. Hope to get some photos from the garage while they do the job. There there was also a leak from the oil pressure sensor, which has been replaced.
[/align]
|


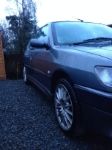


![[Image: 17b33c2a-8471-4313-992e-0a4b324cf926_zps2e63812a.jpg]](http://i143.photobucket.com/albums/r143/matt-taylor/17b33c2a-8471-4313-992e-0a4b324cf926_zps2e63812a.jpg)


 (This should come with your newly purchased radiator)
 This is a 105k mileage car afterall.